The key facts to know before planning this hike
- The main route is about 43.1 km one way and is usually done in 2 to 3 days.
- It is a serious backcountry trip, with mountain views, glaciers, lakes, mud, and mosquitoes all part of the package.
- At present, access is via the Portal trailhead; the Astoria side remains closed until further notice.
- Backcountry camping permits are mandatory, and you must camp only at the sites on your permit.
- The best window is usually late summer into fall, when snow and insect pressure are more manageable.
- This is not a dog-friendly, bike-friendly, or campfire trail.
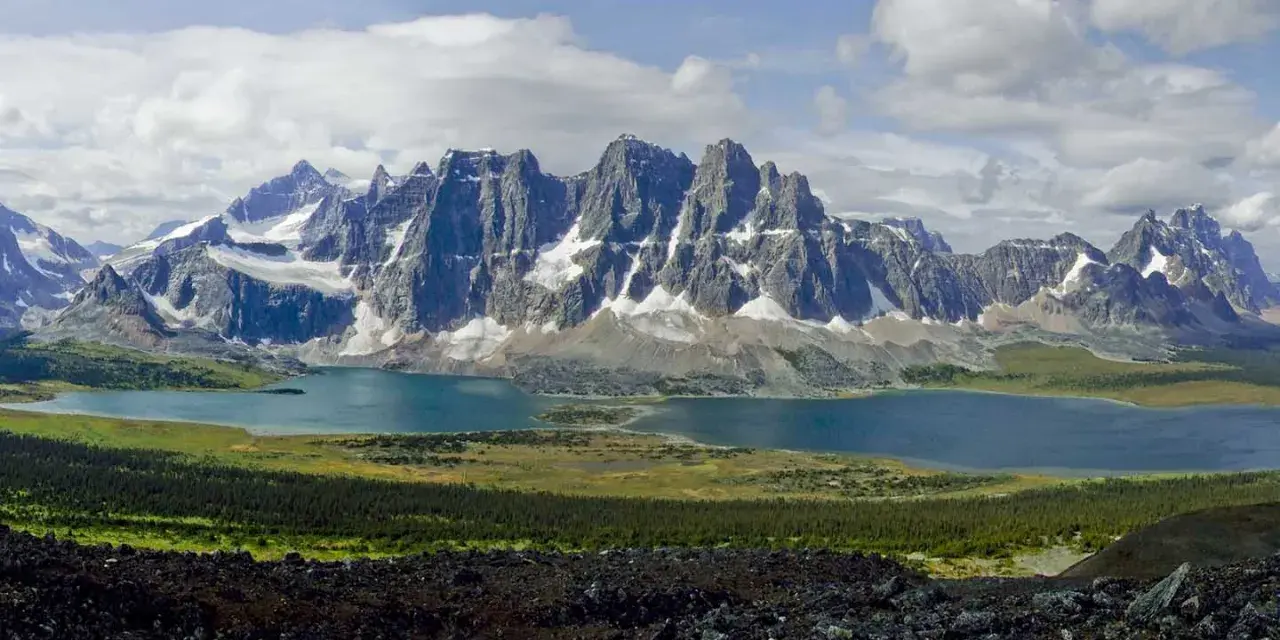
Why this backcountry hike stands out
I would describe this route as a classic Canadian Rockies backpacking experience rather than a simple scenic walk. The draw is obvious once you look at the valley: the Ramparts rising above Amethyst Lake, long alpine views, forested camp spots, and the feeling that every mile is carrying you deeper into proper mountain country. It is also a route where the conditions matter as much as the scenery, because mud, changing weather, and wildlife are part of the experience, not an exception.
That makes it a strong choice for hikers who want a camping destination with a real sense of place. It is less suitable for casual families with young children, but older teens and confident backpackers can enjoy it if they are comfortable carrying a pack, dealing with cold nights, and respecting backcountry rules. The trail tops out at roughly 2,205 m at Maccarib Pass, so even in summer you should expect mountain weather, not warm valley comfort. Once you understand that, the route starts to make much more sense, which is why I next look at how the trail is actually accessed right now.
How the route works in practice
The classic Tonquin Valley line is a horseshoe-shaped traverse between two trailheads, and that shape is one reason the hike feels so rewarding. In an ideal setup, you hike in from one end, camp along the way, and exit from the other. That gives you a cleaner experience than an out-and-back and reduces the sense that you are simply retracing your steps. Right now, though, the practical reality is simpler and a little more restrictive: access is via the Portal side, because the Astoria side is closed until further notice.
That does not make the trip less worthwhile, but it does change the planning logic. I would think about the route in three ways:
| Trip style | What it means | Best for |
|---|---|---|
| Classic point-to-point traverse | You enter from one trailhead and exit the other, usually with a shuttle or second vehicle arranged. | Hikers who want the full one-way experience and can handle transport logistics. |
| Portal-based out-and-back | You start and finish at Portal, turning the route into a simpler access plan. | Anyone working around current closure issues or keeping logistics as light as possible. |
| Base-camp with side hikes | You camp centrally and spend extra time exploring nearby valleys and lakes. | Hikers who prefer fewer pack-ups and want more time for scenery and photography. |
If you want the cleanest hiking rhythm, I would still choose a point-to-point traverse when both ends are open. If not, the Portal approach is perfectly workable, and it still gives you access to the valley’s best camping. That matters because the overnight stops are what turn this from a long hike into a real backcountry trip, which is the next thing I would plan carefully.
Which campgrounds make the best overnight stops
There are seven campgrounds in the valley, plus an Alpine Club of Canada hut that can be booked separately. The campgrounds are all backcountry sites with food storage lockers, and they are all no-fire sites, so your meal plan needs to be stove-based. For me, the campground choice matters more than squeezing out an extra kilometre, because the right site gives you a better view, a better hiking rhythm, or a better base for side trips.
| Campground | Sites | What it feels like | Why I would choose it |
|---|---|---|---|
| Astoria | 4 | Forested ridge above the Astoria River | A practical first stop on the south end when that side is open. |
| Switchback | 8 | Somewhat forested with open mountain views | A solid early-night camp if you want a little more progress on day one. |
| Clitheroe | 8 | Forested, with views toward the Ramparts | Useful as a base for exploring the Eremite Valley. |
| Surprise Point | 4 | Small, scenic, and close to the mountain front | A good choice if you want dramatic views and a quieter feel. |
| Amethyst | 8 | Close to Amethyst Lake and the most central site | This is the most popular campground and the best all-round base for first-time visitors. |
| Maccarib | 8 | At treeline with broad valley views | A strong choice before or after the pass crossing. |
| Portal | 4 | Open forest beside a creek | The obvious fit if you are entering from the Portal trailhead. |
If I were booking this trip for the first time, I would usually aim for Amethyst. It sits in the middle of the action, keeps the Ramparts in view, and leaves room for a side hike into the Eremite Valley or toward Moat Lake if the weather cooperates. The hut is worth knowing about too, but for most camping-focused travellers the campsites are the real story, which makes seasonal timing the next question worth solving.
When to go and what to expect underfoot
The official advice is clear enough: late summer and fall are the best times to enjoy this trail. I agree with that, and I would be even more specific in practice. Early season travel can be slow because higher sections may still hold snow, and the valley floor is known for mud. Mosquitoes are also a major factor, so the “best” date is not just about temperature, it is about how much friction you want to carry on the hike.
| Travel window | What you are likely to face | My take |
|---|---|---|
| June to early July | Snow patches higher up, soft ground, strong bug pressure | Only worth it if you are flexible and prepared for slower travel. |
| Late July to August | Better access, but mud and mosquitoes can still be annoying | A good compromise if you cannot travel later. |
| Late August to September | More stable conditions, fewer insects, strong alpine visibility | This is the window I would choose first. |
| October and later | Colder nights, shorter daylight, possible early snow | Only for experienced hikers who are checking conditions closely. |
Wildlife is another reason to treat the season seriously. The area is home to grizzly bears, black bears, and caribou, so I would never treat it like a simple high-country wander. If the next section feels a little more tactical than romantic, that is intentional, because good preparation is what keeps a beautiful route from becoming an expensive mistake.
What I would pack and arrange before stepping onto the trail
For this hike, the best gear list is not about luxury, it is about friction reduction. If I were packing for Tonquin Valley, I would focus on staying dry, keeping bugs under control, and making sure my food and campsite routine is airtight. The terrain and the weather are already doing enough work against you.
Gear that matters most
- Waterproof boots or sturdy trail shoes with good grip, plus gaiters if the ground is wet.
- Trekking poles for mud, descents, and long pack days.
- Bug protection, especially a head net and repellent in mid-season.
- Warm sleeping insulation, because mountain nights can turn cold quickly even in summer.
- A stove-based cooking setup, since campfires are not allowed.
- Bear spray and food storage discipline, because this is proper bear country.
- Map, GPS, or downloaded navigation, since weather and visibility can change the feel of the route fast.
Planning details that prevent mistakes
- Book a backcountry permit in advance and camp only at the sites on that permit.
- Check road and trail access again before you leave, because current closures can change your starting point.
- If you are doing a point-to-point itinerary, arrange transport before you travel.
- Keep your daily distances realistic, especially if mud or wet weather slows the pace.
- Do not assume a dog-friendly or bike-friendly plan will work here, because it will not.
I would also keep the first and last day a little lighter than my fitness ego wants, because long backcountry days are easier when you leave a cushion for weather and route-finding. That practical mindset is what makes the trip feel smooth, which is why I finish with the part that often matters most to campers deciding where to spend their limited time.