The practical points that shape a Tonquin trip
- The route is 43.1 km one way and is usually treated as a 2 to 3 day backcountry hike.
- In 2026, current access is via Portal trailhead only, so older two-trailhead plans need checking before you rely on them.
- Late summer and fall are the most forgiving windows because mud and mosquitoes are a real part of the experience.
- This is proper backcountry camping: no fires, no dogs, and no bikes.
- A backcountry camping permit is mandatory for every overnight stay.
- Seven campgrounds and an Alpine Club of Canada hut can be booked ahead, so the trip rewards early planning.
Why this alpine camp stands out in Jasper
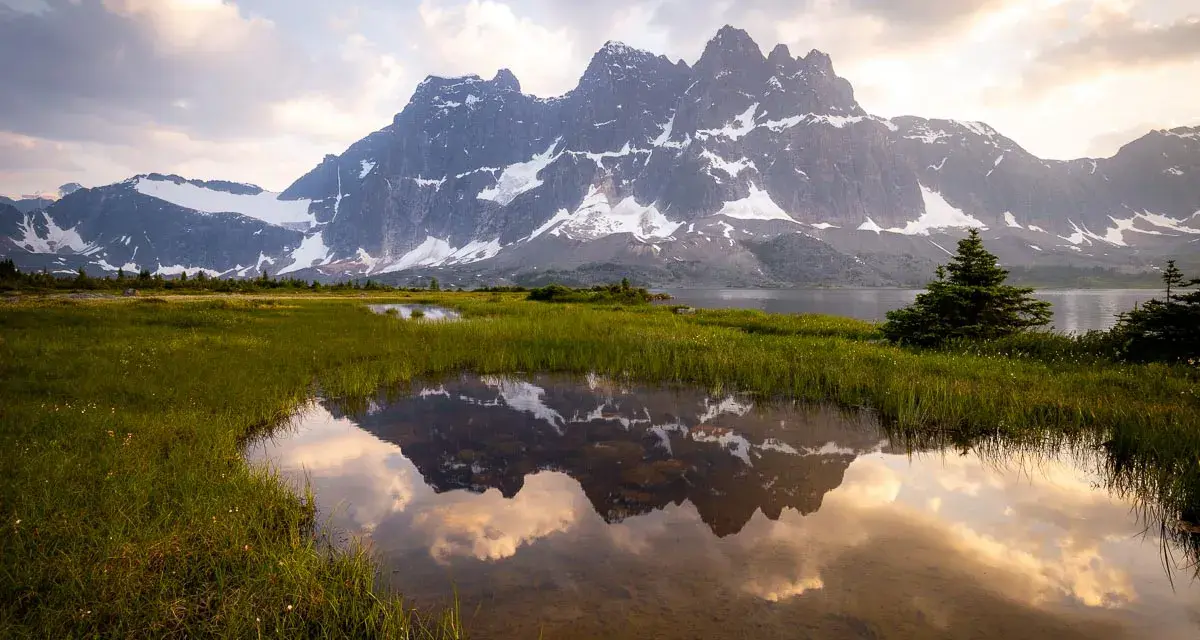
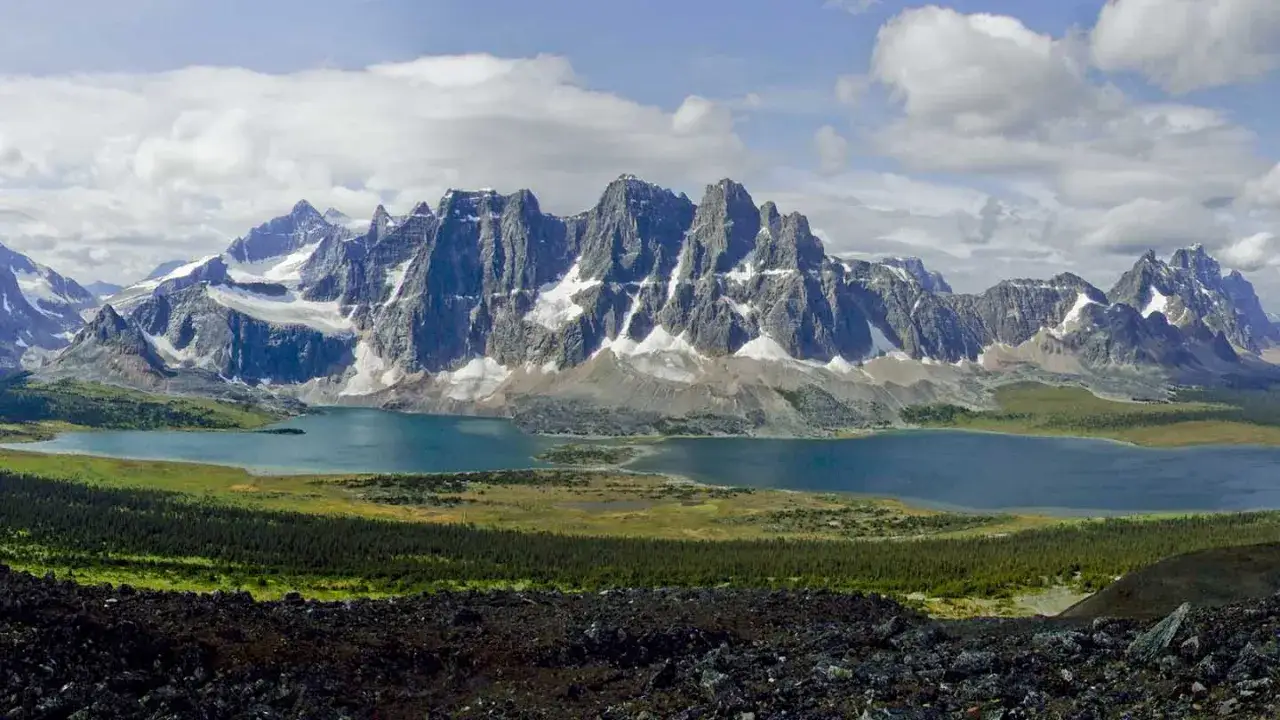
What makes this route special is not just the scenery, although the scenery does the heavy lifting. You are moving through a valley framed by steep rock, glaciers, and the dramatic Ramparts, with Amethyst Lake giving the whole area a central focal point that makes every stop feel earned. I would describe it as a destination for hikers who want their camping to feel like part of the experience, not something bolted on after the walk.
It is also a place with a clear character. The trail is known for wildlife, wet ground, and insects, which means the trip feels wilder than a polished frontcountry campground but more approachable than a technical alpine route. That balance is the reason people keep coming back. Once you understand that trade-off, the next step is learning how the route works now, not how older trip reports used to describe it.
How the route works in 2026
The classic shape of the route is a horseshoe, but current access changes the way you should think about it. Parks Canada currently lists Portal as the open access point, while Cavell Road and the Astoria trailhead remain closed for the 2026 season. In practice, that means I would not plan around an older point-to-point itinerary unless I had checked the latest trail status immediately before departure.
The route statistics still matter because they tell you what kind of effort you are signing up for. The hike is 43.1 km one way, and the maintained trail is treated as a high-priority backcountry route. The full trip is usually described as a 2 to 3 day journey, but that assumes a fit pace, decent weather, and a willingness to travel efficiently rather than linger at every viewpoint.
| Plan | Best for | Why it works |
|---|---|---|
| Portal-based out-and-back | Hikers who want the simplest current logistics | You stay aligned with the open access point and avoid relying on a second trailhead. |
| Portal to a central camp and back | Campers who care more about scenery than mileage | It gives you a stronger alpine feel without forcing a rushed traverse. |
| Older point-to-point plans | People comparing guidebooks or old trip reports | Useful as route history, but only if access changes and the trail status supports it. |
The main lesson here is straightforward: build the trip around the access that is actually open, not the version you found in an older blog post. That keeps your energy focused on the real decision, which is where to camp and how much of the valley you want to see.
Which campgrounds suit different styles of trip
The nicest thing about this valley is that the campsites are not interchangeable. Each one changes the feel of the night, and that matters when you are carrying a pack for several hours. If you choose well, the campsite becomes part of the reward rather than just a place to stop.
| Campground | What it feels like | Why I would choose it |
|---|---|---|
| Portal | Open forest beside a creek | Good for a first night if you want the shortest straightforward approach from the current trailhead. |
| Maccarib | Treeline camp with broad valley views | Best if you want the strongest alpine feel without moving all the way to the most famous lake stop. |
| Amethyst | Lake-side setting with the iconic Ramparts backdrop | The most central and popular option, and the one I would target if scenery is the priority. |
| Surprise Point | Small, exposed-feeling site with dramatic views | Useful if you want a quieter base for side hikes and do not need the busiest location. |
| Clitheroe | Forested camp with mountain views | A practical base for day hiking, especially if you want a bit more shelter. |
| Switchback | Higher, more open camp with wide views | A sensible middle stop when you want to break up the climb and sleep high. |
Seven camps and one hut give you options, but that does not mean every option is equally useful on every trip. I would pick based on what kind of memory you want to take home: easiest access, the best lake-and-mountain photograph, or the quietest night before a longer push. That choice becomes even more important when you factor in the weather.
When to go and what to expect on the ground
Parks Canada specifically points to late summer and fall as the best time to enjoy the trail, and that matches what usually makes a backcountry trip feel manageable. Earlier in the season, the valley can be damp, muddy, and heavy with mosquitoes. Later on, the nights turn colder, but the ground is often firmer and the whole route feels less abrasive.
That does not mean late season is automatically easy. Mountain weather still changes quickly, and a clear morning can turn into a wet afternoon with very little warning. I would plan for three things no matter when you go: wet feet, cold evenings, and more time than you think you need for the terrain.
- Expect mud after rain and keep your pace conservative.
- Carry insect protection even if the forecast looks cool.
- Bring layers that can handle temperature swings between sun and shade.
- Assume wildlife protocols matter from the start, not only after you see a bear.
That is the real rhythm of the valley: a beautiful place that rewards patience, not a place where rushing makes much sense.
What to pack if you want the trip to feel manageable
Backcountry camping here is simple in the sense that the infrastructure is basic, not in the sense that you can arrive lightly prepared. I would pack for self-sufficiency, because the camp facilities are there to support you, not to carry the trip for you.
- A reliable tent that can handle wind and a night of rain.
- A sleeping system warm enough for alpine temperatures, even in summer.
- Water treatment, since I never like to assume untreated water is worth the risk.
- A stove and fuel, because fires are not permitted.
- A detailed map or offline GPS layer, plus a spare battery pack.
- Rain gear, warm socks, gloves, and a spare base layer.
- Insect repellent and, if you are sensitive to bugs, a head net.
- Bear-aware food storage habits, using the provided lockers and keeping a clean camp.
The food lockers are a real advantage, but they are not a substitute for discipline. Keep smells contained, cook away from your tent, and leave no food scraps behind. That is partly about safety, and partly about preserving the kind of experience that makes people want to come back.
A realistic plan for UK travellers
If you are travelling from the UK, the biggest mistake is treating this as a casual add-on to a Jasper holiday. It is a proper backcountry commitment, so I would build the rest of the trip around the hike rather than trying to squeeze the hike around everything else. A clean plan is far better than an overfull one.
- Book your permit first, then arrange the rest of the trip around those dates.
- Arrive in Jasper with a buffer night so jet lag does not get a vote in the itinerary.
- Keep the first hiking day conservative if you are coming off a long flight.
- Leave one extra day in the broader holiday if weather flexibility matters to you.
- Test your backpacking kit at home before you fly, especially if this is your first real alpine overnight.
I also think UK visitors benefit from mentally separating this trip from ordinary campsite travel. You are not simply booking a pitch and turning up with a car full of kit. You are managing a permit, a route, a food plan, and mountain conditions, which is exactly why the reward feels so much bigger when the weather cooperates.
The details that make the valley worth the effort
The best Tonquin trips are usually the ones where the schedule leaves room for small, unplanned moments: a longer stop at a lake, a short side walk to a viewpoint, or an early evening spent watching the light change on the peaks. I would not try to squeeze every kilometre out of the route. The scenery is too good for that, and the pace of the place works better when you let it breathe.
If you remember only three things, make them these: check the current access before you go, respect the no-fire and no-dog rules, and prepare for mud and insects even in a promising forecast. Do that, and the valley becomes what it should be, a demanding but deeply rewarding alpine camp rather than just another box ticked on a hiking list. For most campers, Tonquin Valley works best when you treat it as a serious backcountry trip with a simple goal: travel light, plan carefully, and give yourself enough time to enjoy the setting instead of racing through it.