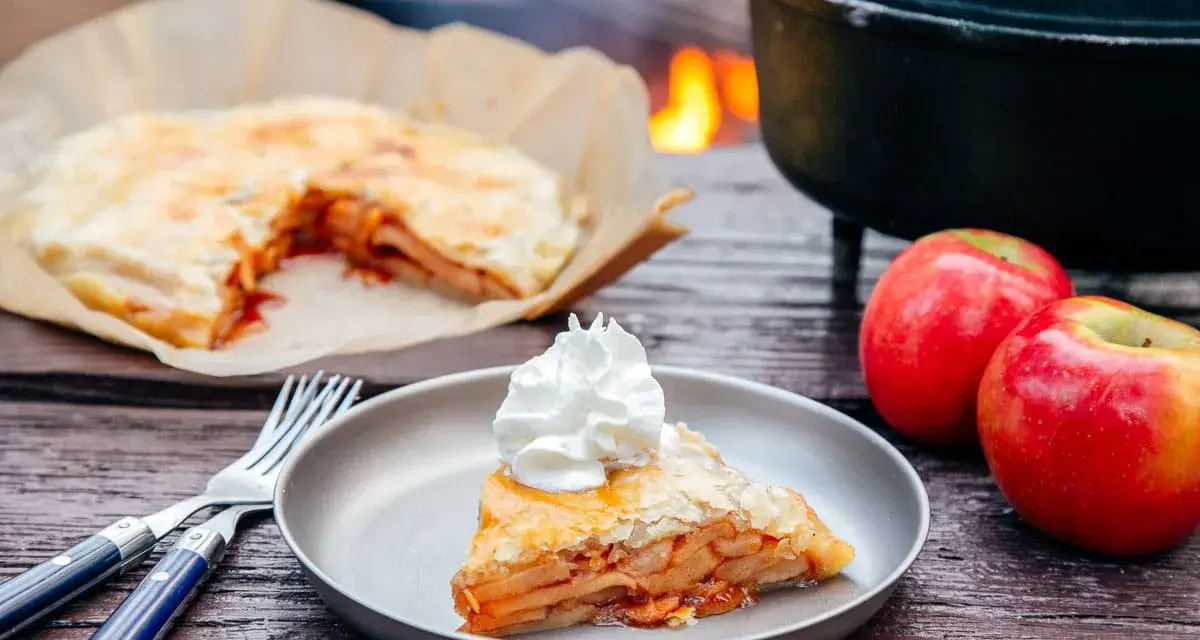
An apple dessert cooked over the fire can be one of the best rewards of a camping trip: modest ingredients, a short cook, and a proper slice of comfort after a day outdoors. This guide shows how I make a campfire apple pie with a crisp crust, a warm spiced filling, and the sort of timing that works on a real campsite, not just in a tidy kitchen. I also cover the gear, apple choices, and the mistakes that turn a promising pudding into burnt pastry.
Key details for a better fire-side dessert
- Cook over glowing embers, not tall flames, or the outside will brown before the filling softens.
- Bramley apples are my first choice in the UK because they stay tangy and bake down well.
- A pie iron gives the most reliable result for one or two portions; a Dutch oven suits a group.
- Keep the filling modest, around 2 heaped tablespoons per individual pie, so the edges seal properly.
- Rest the pies for 2 minutes before serving so the juices thicken and the filling stops burning mouths.
Why this dessert works so well by the fire
I like this kind of pudding because it fits the rhythm of camp cooking. You do not need a long prep list, a complicated set-up, or a perfect oven temperature; you need a sensible filling, a sturdy pastry, and enough heat to crisp the outside without scorching it.
The other reason it works is that apple filling is forgiving. Fruit softens, sugar caramelises, and a little steam inside the pastry helps cook the centre through. That makes it a smarter campsite dessert than anything delicate, and it is exactly why I reach for it when the evening is too good to waste on a fussy recipe. Once that is clear, the next decision is what to pack and which apples will actually earn their place in the cool bag.
Choosing apples, pastry, and the right kit
I keep the ingredient list short because campsite cooking rewards simplicity. The less fiddling you do beside the fire, the less likely you are to end up with one pie that is pale in the middle and another that is blackened on one side.
| Item | Best choice | Why I’d pick it |
|---|---|---|
| Apples | Bramley, or a mix of Bramley and Granny Smith | They hold their flavour, stay pleasantly sharp, and do not collapse into watery mush too quickly. |
| Pastry | Ready-rolled shortcrust pastry | It seals well, is easy to handle outdoors, and copes better with live heat than puff pastry. |
| Thickener | Cornflour | It helps the filling set instead of running out when you open the pie iron. |
| Sweetener | Light brown sugar | It gives a deeper, more caramel-like flavour than plain white sugar. |
| Fat for cooking | A little butter | It helps the pastry brown and stops the iron sticking. |
For equipment, I keep it just as lean: a pie iron or cast-iron sandwich toaster, a small bowl, a spoon, a pastry brush, heatproof gloves or tongs, and a bit of foil. If you are cooking for children, I would also bring a small tray or board for assembly, because it keeps the campsite tidy and makes the process feel manageable. Once those choices are right, the rest is mainly about assembly and heat control.
My go-to recipe for four individual pies
This version makes four small pies, which is a good fit for a family campsite dessert. If you want to feed more people, double it rather than making oversized pies; smaller portions cook more evenly over fire.
Ingredients
| Ingredient | Amount | Notes |
|---|---|---|
| Bramley apples | 2 medium, about 300 g peeled and diced | Use a mix of tart and sweet apples if Bramleys are not available. |
| Light brown sugar | 30 g | Add an extra tablespoon if your apples are very sharp. |
| Ground cinnamon | 1 teaspoon | Enough to smell like proper apple pie without overpowering the fruit. |
| Cornflour | 1 teaspoon | This keeps the juices from running out of the pastry. |
| Lemon juice | 1 tablespoon | Helps stop the apples browning and sharpens the flavour. |
| Salt | 1 pinch | Just enough to round out the sweetness. |
| Ready-rolled shortcrust pastry | 320 g | Keep it chilled until you need it. |
| Butter | 1 tablespoon | For greasing the iron and helping the crust colour. |
| Egg or milk | 1 beaten egg or 2 tablespoons milk | For brushing the edges and top. |
| Optional raisins or sultanas | 2 tablespoons | Useful if you want a sweeter, more traditional filling. |
Read Also: Easy Camping Pasta - One-Pot Meals for Stress-Free Trips
Method
- Mix the diced apples with the sugar, cinnamon, cornflour, lemon juice, salt, and raisins if you are using them. Let the mixture sit for 5 minutes so the sugar starts drawing out the juices.
- Prepare a bed of hot embers. I do not cook this directly in high flames; I wait until the fire has settled enough that the heat is steady and controllable.
- Lightly butter the inside of the pie iron. Cut the pastry into 8 squares or rounds, large enough to line each side with a small overlap.
- Lay one piece of pastry in the iron, add about 2 heaped tablespoons of filling, then top with the second piece. Brush the edges with egg or milk and press firmly to seal.
- Trim any overhanging pastry, cut a tiny steam vent in the top, then close the iron. Cook for 6 to 8 minutes, turning every 1 to 2 minutes so both sides brown evenly.
- Open carefully. If the crust is pale, give it another minute or two over the embers. When it is deep golden and the filling is bubbling, let it rest for 2 minutes before serving.
If you are using a foil parcel instead of a pie iron, wrap each filled portion in a double layer of foil and cook it on a grill over embers for 12 to 15 minutes, turning once. The texture is less crisp, but it is the simplest method when you do not want to carry extra kit. That brings us to the choice that matters most on site: which cooking method suits the trip you are actually on.
Which cooking method gives the best result
I have cooked this three ways, and each one suits a different kind of campsite evening. If I am feeding one hungry child and one adult who wants dessert now, I choose the pie iron. If I am cooking for a group, I lean towards a Dutch oven because it scales better. The foil parcel sits in the middle: easy, light, and reliable enough when you want something simple.
| Method | Best for | Typical time | My verdict |
|---|---|---|---|
| Pie iron | One or two portions, quick serving, crisp edges | 6 to 8 minutes | The best balance of speed, flavour, and texture. |
| Foil parcel | Lightweight kit and no special equipment | 12 to 15 minutes | Very practical, but the crust will be softer and less browned. |
| Dutch oven | Family-sized batches and a proper campsite dessert | 20 to 30 minutes | Best when you want a fuller pie feel, but it needs more heat management. |
My honest view is that the pie iron is the easiest place to start. It gives you a sealed, handheld result with very little mess, and it is hard to beat when children are waiting around the fire. Whichever method you use, the same heat mistakes can still spoil the result, so the next section is the one that saves most people from disappointment.
How to stop burnt pastry and leaking filling
- Do not overfill the pastry. Too much apple is the quickest way to get leaks, sticky edges, and a soggy base.
- Keep away from open flames. Flames brown the outside far too fast; embers give a slower, more even cook.
- Seal the edges properly. Press them firmly with a fork or the rim of the pie iron so the juices stay inside.
- Use a little thickener. Cornflour or plain flour helps the filling set once the apples start releasing juice.
- Turn the pie regularly. A quick turn every minute or two helps prevent one side from scorching.
- Let it rest before eating. Straight from the iron, the filling can be dangerously hot even when the crust looks ready.
The biggest mistake I see is impatience. People want colour before the heat has had time to reach the centre, so they cook too hot, too fast, and too close to the flame. If you keep the fire calm and the filling modest, the result becomes much more predictable. A little planning at home makes the campsite version far less stressful, which is why I usually prep the filling before I leave.
Make-ahead and serving ideas for camping trips
I prefer to do as much as possible in advance. On the day, I only want to slice, fill, cook, and eat. If I am packing for a family break, I mix the sugar, cinnamon, cornflour, and salt at home, then carry that dry blend in a small container or bag. The apples can be peeled and chopped a little earlier in the day, then tossed with lemon juice so they stay fresh.
- Keep the pastry flat in a cool bag so it stays easy to handle.
- Store the filling separately until just before cooking.
- Pack a small brush, because a light glaze on the pastry edges improves sealing and colour.
- Serve with custard if you want a proper British finish, or use cream or vanilla ice cream if the weather is warm.
- For a sweeter finish, dust the cooked pies with cinnamon sugar while they are still hot.
If the campsite is windy or the fire is uneven, I would lean even harder towards foil parcels or a covered cooker. The aim is not perfection; it is a dessert that feels generous, simple, and genuinely worth making outdoors. For me, the difference between a decent pudding and a memorable one is usually the packing list.
What I would pack for a family fire-side dessert
For a family weekend, I would keep the kit narrow and repeatable: one pie iron, one pack of ready-rolled shortcrust pastry, two Bramley apples, a small jar with the sugar-spice mix, a lemon, butter, and a folding board or tray. That is enough to make the process calm instead of chaotic, and it leaves room for the part everyone actually remembers, which is sitting by the fire and eating something warm together.
If you want the shortest path to a good result, keep the filling tart, the pastry chilled, and the heat steady. That combination does the real work, and once you have it right, this is one of those campsite recipes you will come back to without needing to think about it.