Learning how to make coffee while camping comes down to three decisions: how much gear you want to carry, how much time you have before breakfast, and how clean you want the process to stay. I usually think in terms of “good enough in a mug” versus “worth lingering over,” because camp coffee should match the trip rather than fight it. The guide below covers the most reliable methods, the right grind and ratio for each one, and the small mistakes that make coffee taste flat outdoors.
The easiest path to better camp coffee is to match the method, grind, and water to the trip
- Instant coffee is the fastest choice and needs only hot water.
- AeroPress gives the cleanest flavour with very little cleanup and works well for one or two people.
- French press suits slower mornings and larger servings, but it needs a coarse grind and a bit more rinsing.
- A good starting ratio is 1:16 coffee to water by weight, which is about 15-16 g for a 250 ml mug.
- For most UK campsites, a gas stove, small kettle, and wind protection are more useful than trying to brew over a weak flame.
Choose the method that fits the campsite, not your kitchen at home
On a campsite, the best brewer is the one that still feels easy when the weather is cold, the table is crowded, or one child is asking for toast at the same time. I judge each option by four things: taste, cleanup, portability, and how much it asks of me before I have had my first cup.
| Method | What you need | Taste | Cleanup | Best use | My take |
|---|---|---|---|---|---|
| Instant coffee | Sachet or jar, mug, hot water | Basic but dependable | Almost none | Backpacking, rainy mornings, late starts | The fastest option when convenience matters most |
| Pour-over | Cone, filter, mug, kettle | Bright and clean | Low | Small groups, tidy pitches | Excellent if you can pour steadily |
| French press | Press pot, kettle, coarse grounds | Full-bodied and round | Medium | Car camping, relaxed mornings | Good flavour, but it punishes sloppy grinding |
| AeroPress | Brewer, paper filters, kettle | Strong, clean, versatile | Low | One or two cups, travel, family trips | My default when I want proper coffee with little fuss |
| Percolator | Percolator, stove, grounds | Strong and classic, sometimes bitter | Medium | Groups, big breakfasts | Good for volume, less good for finesse |
| Cold brew | Jar, filter, cooler or fridge space | Smooth and low-acid | Very low at serving time | Hot weather, planned trips | Best when you can prepare it ahead |
For a family campsite, I would rather bring one compact system that makes two decent cups than a complicated setup that only works if everything goes right. Once you know the method, the next job is packing the coffee correctly so the cup tastes the way it should.
Pack the coffee properly before you leave
Most camp coffee problems start before the water is even hot. If the beans are stale, the grind is wrong, or the coffee has not been portioned, you are already fighting an uphill battle. I usually decide in advance whether the trip is about flavour or simplicity, because that choice shapes everything else.
| Method | Grind size | Starting point |
|---|---|---|
| Instant | None | 1 sachet or 1-2 teaspoons per mug |
| Pour-over | Medium | 15 g coffee to 250 ml water |
| French press | Coarse | 30 g coffee to 500 ml water |
| AeroPress | Medium-fine | 16-18 g coffee to 200-240 ml water |
| Percolator | Coarse | About 1:16 by weight, then adjust to taste |
- Whole beans are best if you have room for a grinder and want the freshest flavour.
- Pre-ground coffee is the easier choice for short breaks and family trips, especially if you pre-portion it at home.
- Coarse grind works best for French press and percolators because it reduces grit and bitterness.
- Medium grind suits pour-over brewing and keeps the flow steady.
- Medium-fine grind is a good starting point for AeroPress recipes.
A practical ratio helps more than guesswork. A solid starting point is 1:16 coffee to water by weight, so 20 g of coffee needs about 320 g of water, and a 250 ml mug usually lands around 15-16 g of coffee. If I do not want to bring scales, I portion the coffee into small bags at home so I can brew without thinking. With the coffee packed properly, the brewing step becomes much more predictable.
Brew it simply with the methods that actually hold up outdoors
I do not think camp coffee needs to be clever. It needs to be reliable, quick to clean, and forgiving when the morning is moving fast. These are the methods I trust most because they work without turning breakfast into a project.
Instant coffee when speed matters
Instant coffee is the least romantic option, but it has a real place in camp cooking. Add one sachet or a small spoonful to a mug, pour in 180-200 ml of hot water, stir, and you are done. It is the method I recommend when you are hiking, arriving late, or dealing with a cold, windy morning and you want coffee now, not in ten minutes.
AeroPress for clean flavour with very little faff
The AeroPress is compact, quick, and forgiving. A practical camp recipe is 16-18 g of coffee, water at about 85°C, a short stir, a 30-45 second steep, and a gentle press. The paper filter keeps the cup clean, which matters if you want a smoother drink without grounds at the bottom. I like it because it feels close to proper brewing without asking for much counter space.
French press when you want a fuller cup
French press coffee is easy to enjoy if you respect the grind. Use coarse grounds, add about 30 g of coffee to 500 ml of water, pour in water that has just come off the boil, and let it steep for about 4 minutes before pressing slowly. Press too hard or use too fine a grind and the cup can turn muddy or bitter. For car camping, though, it is still one of the most satisfying options.
Read Also: Perfect Campfire Apple Crisp - No More Soggy Topping!
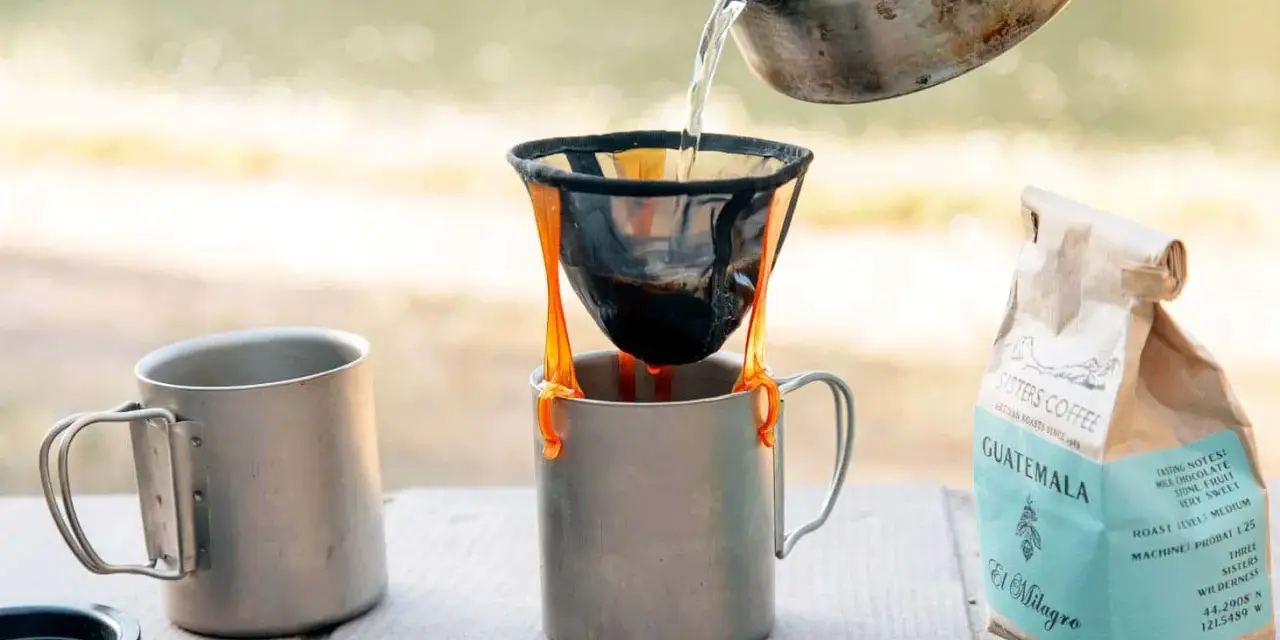
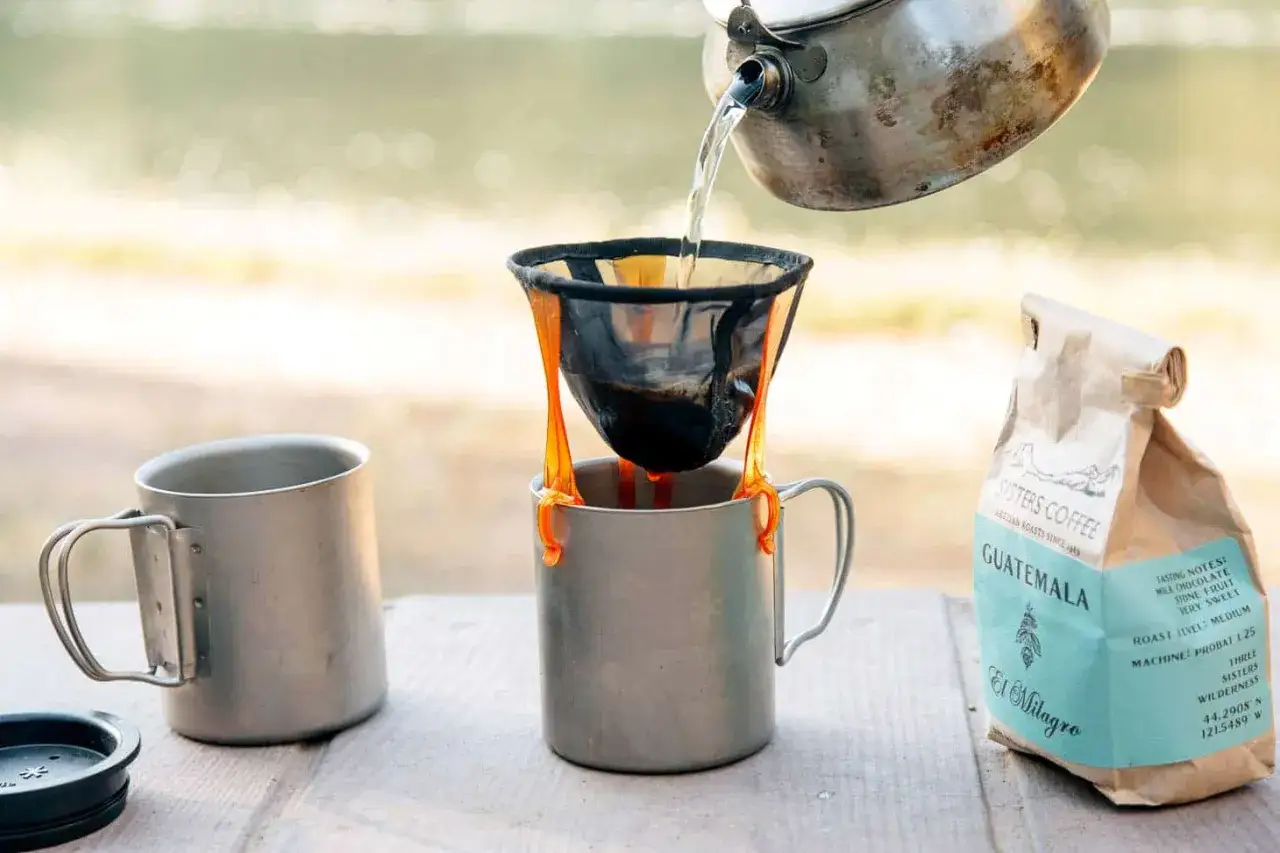
Pour-over when you want a neat, bright cup
Pour-over works well when you have a steady hand and do not mind paying attention for a minute. Rinse the filter, add about 15 g of coffee for 250 ml of water, pour a small bloom first, then finish with slow circular pours. The result is usually lighter and cleaner than French press coffee, which is why I reach for it when I want a tidy, predictable cup on a calm campsite morning.
If you are brewing for a bigger group, a percolator can make sense because it handles volume better than most portable systems. I would still treat it as a “feed everyone” tool rather than a flavour-first brewer. Once the method is chosen, the next variable is water temperature, and that is where many camp cups quietly go wrong.
Heat the water without making the morning harder than it needs to be
Camp coffee gets better when the water is hot enough, but not so aggressive that it scorches the grounds or wastes fuel. On a gas stove, a small kettle is usually the cleanest solution in the UK because it is simple, predictable, and works even when the weather turns. I also keep a windbreak nearby, because a sheltered burner is far more efficient than trying to push a weak flame harder.
| Method | Water cue | Why it helps |
|---|---|---|
| Instant coffee | Fully boiled water is fine | There is no brewing stage to protect |
| AeroPress | About 85°C | Helps keep the cup smooth and balanced |
| Pour-over | Just off the boil, roughly 90-96°C | Supports even extraction without harshness |
| French press | Just off the boil | Reduces the chance of a flat or overcooked taste |
| Cold brew | No heat needed at serving time | Useful when the weather is warm and you plan ahead |
- Boil a little more water than you think you need, especially if breakfast and washing up are happening at the same time.
- Let water rest for a short moment after boiling if you are brewing pour-over or French press coffee.
- Use a lid on the kettle where possible, because heat loss is one of the easiest ways to slow the morning down.
- If you are using a campfire, make sure the site allows it and that the fire is stable enough for safe brewing.
Once the water is under control, the remaining problems are usually small ones, which is good news because small problems are the easiest to fix. The next section is where I would look first if the cup tastes bitter, weak, or strangely flat.
Avoid the mistakes that make camp coffee worse than it should be
The biggest camp coffee mistakes are rarely dramatic. They are usually small habits that compound: grinding too fine, leaving the coffee on the heat too long, or using a ratio that was guessed instead of measured. If the cup tastes wrong, I correct one variable at a time rather than changing everything at once.
- Too fine a grind for French press will create sludge and bitterness.
- Overboiling the water can flatten the flavour, especially in lighter brews.
- Letting coffee sit on the grounds for too long keeps extracting and pushes the taste towards harshness.
- Using stale coffee is the quickest way to lose flavour before brewing even starts.
- Skipping a rinse leaves oils and residue that affect the next cup, especially in press pots and reusable filters.
- Taking fragile home gear on a rough trip is a false economy; camp kit should tolerate being packed and unpacked repeatedly.
If the coffee tastes bitter, I first go coarser on the grind or shorten the steep time. If it tastes weak, I increase the dose before I reach for more sugar. That simple discipline usually fixes the problem faster than swapping to a new brewer, which is why the smallest practical kit often performs the best.
The smallest camp coffee kit that still feels civilized
My own packing list changes with the style of trip, but the logic stays the same: carry only what earns its place. For light travel, I want coffee gear that disappears into a bag. For a family pitch, I want something durable enough to make two or three cups without drama.
| Trip style | Best kit | Why it works |
|---|---|---|
| Backpacking or very light travel | Instant coffee, mug, spoon, compact water source | Minimum weight and almost no cleanup |
| Weekend car camping | AeroPress, filters, hand grinder, kettle, airtight coffee tin | Best balance of flavour, speed, and portability |
| Family camping | French press or percolator, larger kettle, coarse grounds, dish cloth | Handles more cups without repeating the process every few minutes |
For most UK family trips, I would pack a small kettle, a hand grinder if I have room for one, and either an AeroPress or a sturdy French press. That combination keeps the ritual enjoyable without turning morning coffee into a chore. Get the method, grind, and water right, and camp coffee becomes one of the easiest parts of the day rather than another job to manage.