Backpacking comfort starts long before the first uphill climb. The simplest way to think about how to pack a backpacking pack is to organise it by weight, access, and weather protection, so the gear you need most often is the easiest to reach and the heaviest items sit close to your back. In this guide, I’ll show you how to build the load zone by zone, keep the pack stable on your body, and avoid the small mistakes that make a hike feel harder than it should.
The best-packed hiking pack feels stable, tall, and easy to live out of on the trail
- Put dense items close to your spine and keep the pack’s shape tall rather than squat.
- Use the bottom of the pack for light, bulky kit such as a sleeping bag or spare layers for camp.
- Keep rain gear, snacks, navigation, and first aid within easy reach.
- Separate wet, dry, and fuel items so one leak does not spread through the whole bag.
- Adjust the hipbelt, shoulder straps, and load lifters with real weight inside the pack.
Sort your kit before anything goes in the pack
I never start by stuffing clothes into empty space. I spread everything out first and sort it into simple piles: sleep system, cooking kit, clothing, water, and trail essentials. That gives me a clear picture of what needs protection, what needs quick access, and what can stay buried until camp.
For a typical one- to three-night trip in the UK, a 30 to 50 litre pack is often enough if your kit is compact and you are not carrying oversized luxury items. If you are using older, bulkier gear, that volume can disappear quickly. I also line the pack with a waterproof liner before anything else goes in, because most hiking packs shrug off drizzle better than they survive a proper downpour.
- Group items by use, not by room or by habit.
- Keep sleep gear separate from cooking gear.
- Use stuff sacks, which are simply small bags for grouping kit, but do not overdo them.
- Keep anything that must stay dry inside a liner or dry bag.
Once the gear is sorted, the next question is where each pile should sit inside the bag.
Build the pack from the bottom up
I pack in zones because a hiking pack feels better when the load works with the body instead of against it. The main rule is simple: heavy items go close to your back, light and bulky items fill the spaces farther out, and the most useful pieces stay near the top or in pockets.
| Zone | What goes there | Why it belongs there |
|---|---|---|
| Bottom zone | Sleeping bag, camp clothes, sleep layers | Bulky but light items that you will not need until camp |
| Core zone | Food, stove, fuel, tent body, water bladder | Dense items that help stabilise the pack’s centre of gravity |
| Top zone | Rain jacket, insulation layer, wash kit, evening snacks | Useful items you may want during the day or soon after arrival |
| Outer pockets | Map, phone, gloves, headtorch, first aid, water bottle | Small items you need without unpacking the whole bag |
If I am carrying liquid fuel, I keep the bottle upright and away from food so a spill does not spread through the rest of the pack. I also try to shape the load so the bag looks tall and thin, not short and boxy; that keeps the centre of gravity, the point where the weight feels balanced, closer to my spine.
With the zones in place, the next layer is balance.
Keep the load balanced against your spine
A pack that leans to one side feels wrong almost immediately. I aim for left-right balance first, then front-back balance, because both matter once the trail turns uneven or the path tilts across a slope. If I put a water bottle, stove, or food bag on one side, I match it with something similar on the other side or move the heavier item to the centre.
Side-to-side balance
The goal is not perfect symmetry, but the pack should not pull one shoulder lower than the other. If I feel twist in the torso after a short walk, I usually repack before I blame the suspension.
Compression and shape
Compression straps pull the load inward and stop it from slumping away from the back panel. That matters more than it sounds, because a tight, compact pack moves less with each stride and wastes less energy than a loose one that sways and rebounds.
That balance only works if the items you need during the day are still easy to reach, which is where pockets matter.
Use pockets and outside straps sparingly
Exterior storage is for convenience, not overflow. If I need something during the day, it goes in a pocket or in the top section of the main compartment; if I only need it at camp, it can live deeper in the bag.- Top lid or brain pocket: map, phone, gloves, sunscreen, small repair kit.
- Hipbelt pockets: snacks, lip balm, compass, headtorch, blister care.
- Stretch side pockets: water bottle or a damp rain jacket you need to grab quickly.
- Lash points: trekking poles or a sleeping mat only when the pack is designed for it.
I rarely hang anything loose outside the pack unless there is a good reason. Dangling gear snags on hedges, gate stiles, and branches, and it can swing enough to throw off the rhythm of a long walk.
Before I trust the layout, I make sure the harness is actually carrying the weight the way it should.
Fit the harness before you judge the packing
Even a well-packed bag feels miserable if the fit is off. I like to load the pack with a realistic weight, lift it from the floor with care, and then adjust the harness from the hips up. That way I am judging the actual carry, not an empty shell.
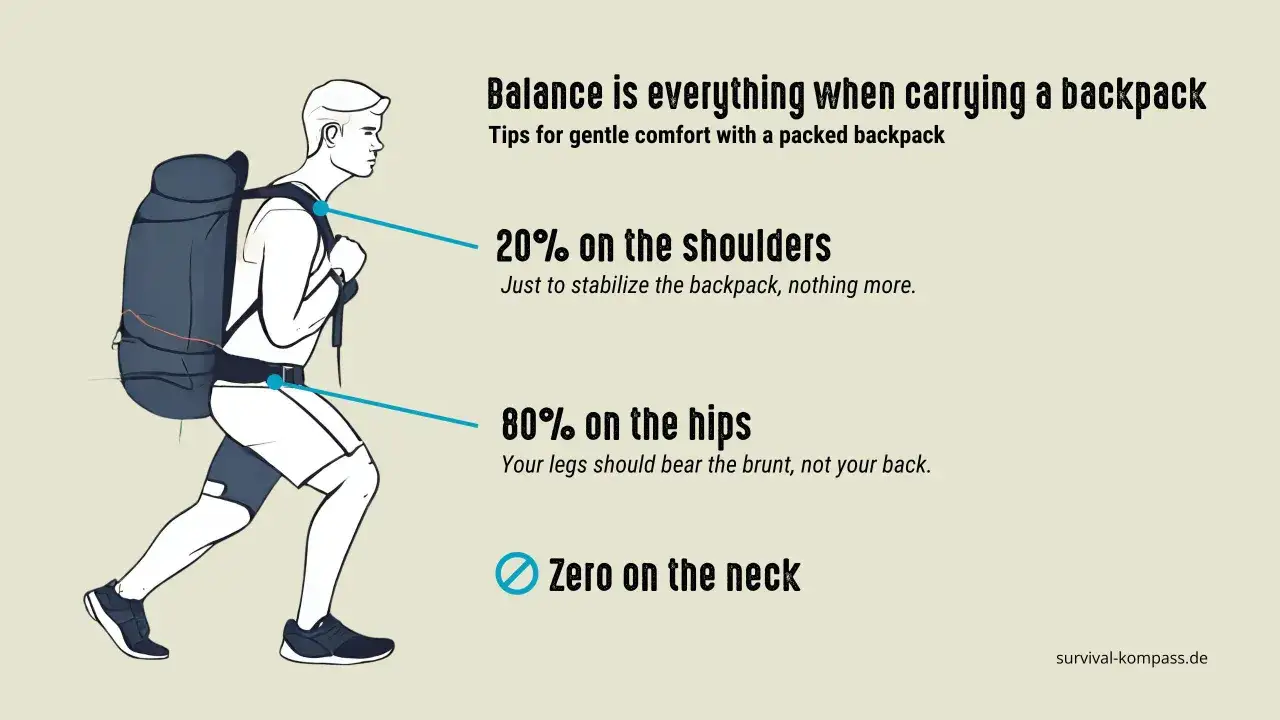
Hipbelt
The padded section should sit on top of the hip bones and take most of the load. If the belt rides too high or too low, the pack will feel unstable no matter how neatly you packed it.
Shoulder straps
Shoulder straps should hug the body without becoming the main suspension system. I want them snug enough to stabilise the pack, but not so tight that they drag weight onto the shoulders and neck.
Load lifters
These small straps at the top of the harness pull the pack closer to your upper back. Around a 45-degree angle is a useful target; if they lie flat, the load is usually hanging too far away from the body.
Read Also: Merrell Moab 3 Waterproof - Is It Really? Find Out Now!
Sternum strap
The sternum strap keeps the shoulder straps from drifting apart. It should feel secure, not restrictive, and it should never be the strap that is doing the heavy work.
If the torso length, the vertical length of the harness, is wrong, no amount of repacking will make the bag feel right, so I always check that before I blame the contents.
Once the fit is set, the remaining problems are usually packing habits, not pack design.
The mistakes that make a light pack feel heavy
- Putting heavy items too low or too far from the back: that creates a sagging, tippy feel.
- Overloading one side: it may seem minor at the start, but it adds fatigue over time.
- Using the outside of the pack as extra storage: loose kit catches, swings, and gets lost more easily.
- Mixing wet and dry items: a soaked shell or tent fly can dampen insulation and sleep gear fast.
- Ignoring pack shape: a short, fat load is harder to carry than a compact vertical one.
- Skipping a practice carry: you discover the pressure points too late, usually on the first climb.
I also see people overdo stuff sacks. They are useful for organisation, but if every item lives in a separate bag, the pack starts to waste space and becomes harder to mould into a stable shape.
That leaves the final check I would make before walking out of the door.
The last 60-second check before the trail
Before I leave the car park, I run through a quick list in my head:
- Can I reach my rain jacket, snacks, map, and headtorch without unpacking the whole bag?
- Is the heaviest gear centred and close to my back?
- Are the left and right sides roughly even?
- Is the hipbelt sitting on the hips and doing real work?
- Are the compression straps snug enough to keep the load tall?
- Is fuel upright, sealed, and separated from food?
- Is anything dangling that could snag or swing?
If one of those answers is no, I fix it before the first steep section rather than halfway up it. That is usually the difference between a pack that feels like part of the stride and a pack that keeps reminding you it exists.