Good layering is less about piling on clothing and more about building a system that keeps you dry, warm, and able to change pace as the trail changes. The simplest answer to how to layer for hiking is to start with a sweat-managing base, add insulation you can vent, and finish with a shell that stands up to British rain and wind. That matters most on UK walks, where a calm start can turn into drizzle, gusts, and a cold summit in the space of an hour.
The right hiking layers keep you dry, warm, and ready for changing weather
- Base layer: choose something that wicks sweat fast and sits close to the skin.
- Mid layer: fleece or light synthetic insulation gives warmth without trapping too much moisture.
- Outer shell: a breathable waterproof jacket is the layer that protects the whole system.
- Fit matters: every layer should work over the one below it without feeling tight across the shoulders or chest.
- Start slightly cool: it is easier to add a layer than to recover once you are already sweaty.
- UK weather is changeable: carry one extra layer for stops and one shell for wind and rain, even on short walks.
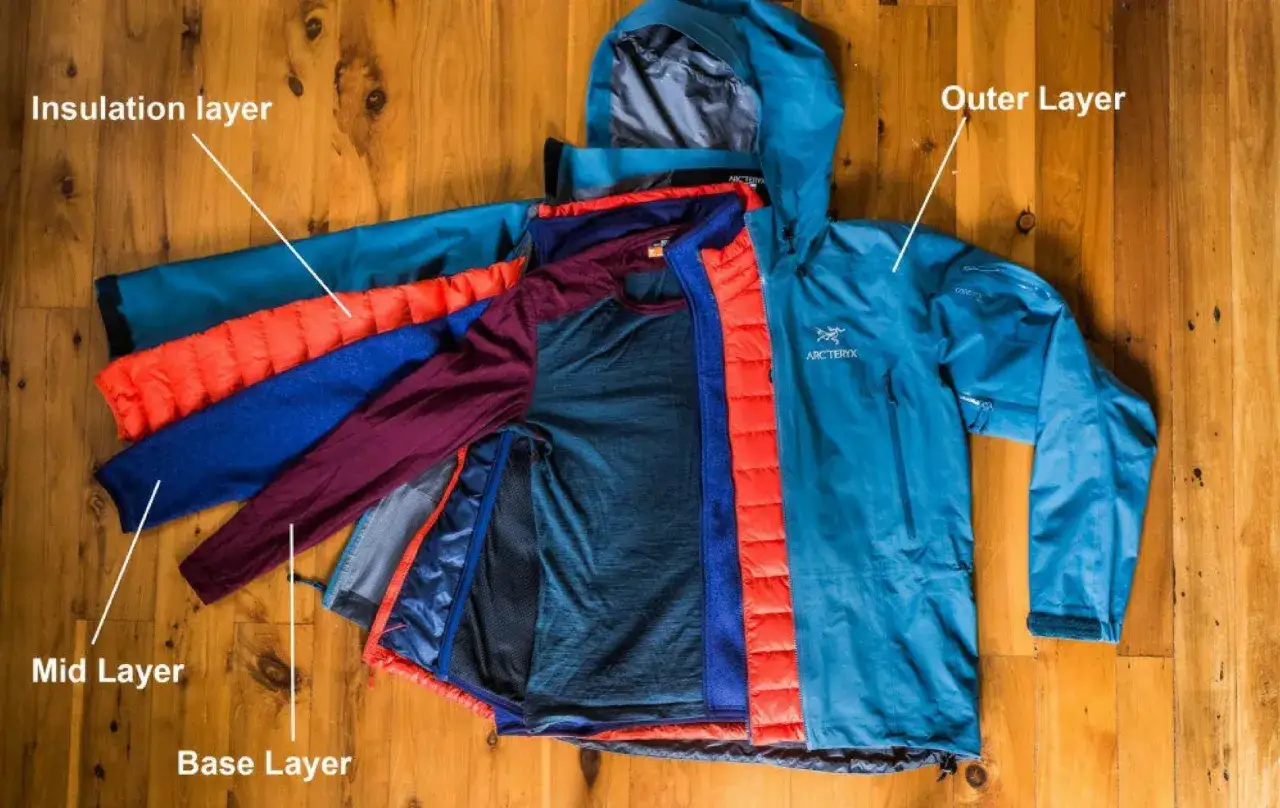
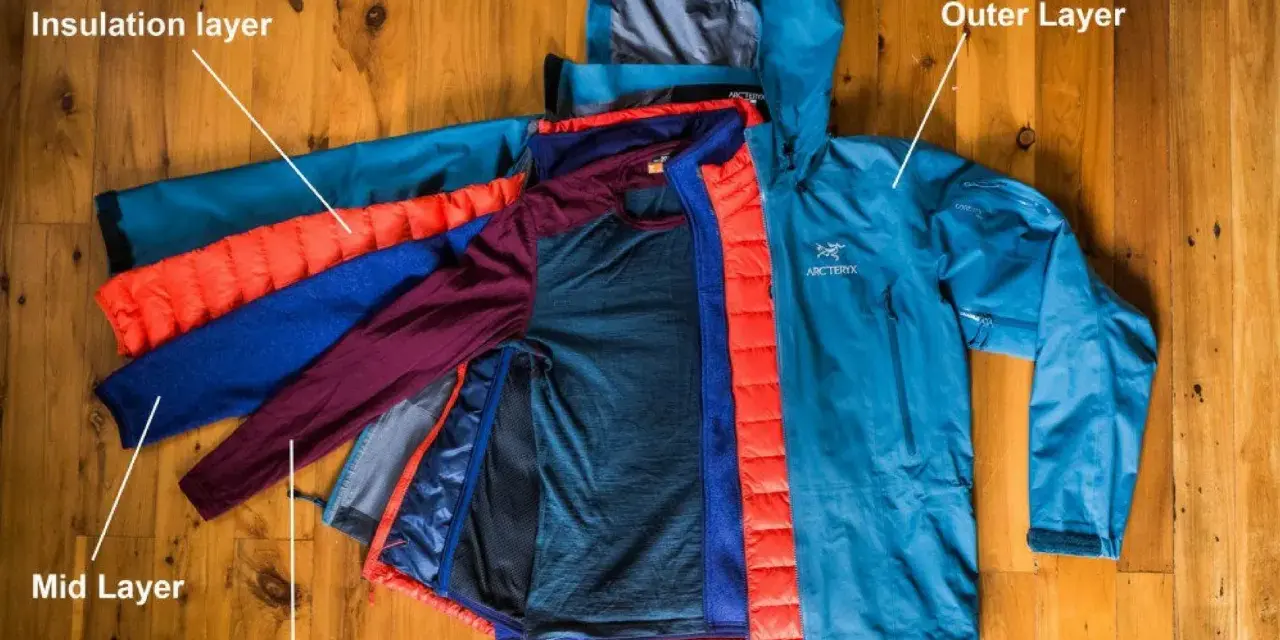
Build the three-layer system from the skin out
The cleanest way to think about hiking clothing is as a job split into three parts. The base layer manages sweat, the mid layer traps warmth, and the outer layer shields you from wind and rain. If one of those jobs is missing, the whole system feels clumsy very quickly.
I like to start with the base layer because it decides how comfortable everything else feels. A good base layer should be snug enough to move moisture away from the skin, but not so tight that it feels restrictive when you reach, climb, or carry a rucksack. On UK hill walks, a long-sleeve top often works better than a short-sleeve one, simply because wind and drizzle can bite sooner than you expect.
The mid layer is the part most people get wrong. They either make it too bulky, which causes overheating on climbs, or too thin, which leaves them cold as soon as they stop. For most of my walks, a fleece or grid fleece is the sweet spot because it keeps warming even when the air turns damp and it still breathes well.
The shell is there to deal with weather, not to replace the other layers. A waterproof jacket should fit over your base and mid layer without compressing them flat, because crushed insulation loses much of its value. If the jacket has pit zips, that is a real advantage on steeper routes, since it lets me dump heat without taking the whole shell off.
Once the order is right, the next question is what each fabric should actually be made from.
Choose fabrics that keep moisture moving
For general UK hillwalking, I find a base layer in the 150-200 gsm range is a useful starting point. GSM means grams per square metre, and in practice it is a simple way to judge fabric weight: lower numbers usually feel lighter, higher numbers usually feel warmer. That said, the right choice still depends on how hard you hike and how much you sweat.
Here is the short version of what tends to work best and why.
| Material | Best use | What it does well | Where it falls short |
|---|---|---|---|
| Merino wool | Base layers and light cool-weather tops | Feels comfortable across a wide temperature range and resists odour well | Usually costs more and dries more slowly than many synthetics |
| Polyester or nylon blends | High-output hikes and humid days | Dries quickly and moves sweat away efficiently | Can feel less soft and may hold odour longer |
| Fleece or grid fleece | Active mid layer | Breathable, light, and warm while you are moving | Needs a shell when wind or rain picks up |
| Synthetic insulation | Cold, damp stops | Stays useful when conditions are not perfectly dry | Bulkier than fleece and less airy on the climb |
| Down | Dry cold and long breaks | Excellent warmth for the weight | Loses performance if it gets wet |
| Waterproof breathable shell | Wind and rain | Protects the whole system from the weather | Must be roomy enough to layer over insulation and still vent well |
My rule is simple: use merino if you value comfort and odour control, choose synthetics if you expect to work hard and dry fast, and keep fleece as your default mid layer unless you know you run very cold. Down still has a place, but I treat it as a stop layer in dry weather rather than the one jacket I rely on for everything.
Cotton sits on the opposite end of the scale. It absorbs sweat, dries slowly, and becomes a liability the moment the wind rises. On a short summer stroll, that may only feel annoying; on a damp ridge with a steady breeze, it can make the whole day colder than it should be.
With fabrics sorted, the next step is matching the system to the conditions you are actually heading into.
Match the system to the day you actually expect
UK weather is rarely one-note. A walk that starts dry can end in clag, and a sheltered path can turn exposed once you reach higher ground. I plan layers around the worst believable part of the day, not the best-looking forecast window at breakfast.
| Trail conditions | What I would wear | Why it works |
|---|---|---|
| Mild and dry | Light base layer, fleece in the pack, shell packed away | Keeps you cool on the move and ready for a temperature drop later |
| Windy but mostly dry | Base layer, light fleece or softshell, packable shell | Softshell helps with wind while still breathing better than a full waterproof |
| Wet and changeable | Base layer, fleece, breathable waterproof shell, rain trousers if the ground is boggy | Protects warmth and stops damp from creeping into the rest of the system |
| Cold ridge or summit day | Warmer base layer, fleece, synthetic insulation for stops, shell on top, hat and gloves | Handles both movement and stillness without forcing you into one oversized jacket |
For regular wet-weather use, I like to look for a waterproof rating around 20,000 mm or higher, and breathability around 15,000 g/m²/24hrs if I know I will be working hard or carrying a pack. Lower numbers can still be fine for short, fair-weather walks, but they are easier to overwhelm once the rain lasts or the climb gets steep. The key is not chasing the biggest number on the label; it is buying enough protection for the kind of walking you actually do.
Softshell deserves a mention here because it gets useful in exactly the sort of mixed weather UK hills produce. A softshell is a breathable, slightly weather-resistant layer that can handle wind and light drizzle, but it is not a substitute for a real waterproof in persistent rain. I reach for it when movement matters more than full storm protection.
Once you have the right combination, the real skill is adjusting it before you overheat.
Adjust layers before you get hot
The biggest mistake I see is waiting until sweat is already building. By then, your base layer is damp, your mid layer is working against you, and the first cold pause at the top of the hill feels sharper than it should. I would rather start a little cool and manage heat early than try to rescue comfort later.
- Open vents early. Use the front zip, pit zips, or sleeve cuffs before you are sweating hard.
- Remove insulation on climbs. A fleece or light puffy that feels perfect at the car park can become too much within ten minutes on a steep ascent.
- Put the shell on before you are soaked. Once the rain starts cutting through wind, the waterproof is there to preserve warmth, not create it.
- Add warmth again at stops. As soon as you pause for lunch, a map check, or a family break, put the warm layer back on before the chill settles in.
- Keep a dry backup. A spare base layer in a dry bag is one of the smallest things in a pack that can save the day.
- Use the hike’s rhythm. On stop-start walks, especially with children, I build in quick checks for damp backs, cold hands, and open zips before anyone gets uncomfortable.
This is where layers become more than clothing and start acting like a temperature control system. If a hill is steep, a breeze is strong, or the pace changes a lot, the best kit is the kit you can adjust quickly without stopping the whole walk.
That principle matters even more once you start paying attention to the smaller pieces people often leave as an afterthought.
Don’t ignore legs, hands, socks, and headwear
Upper-body layers get most of the attention, but the comfort gains often come from the edges: feet, wrists, ears, and neck. If those areas are wrong, you feel colder much sooner than the temperature alone suggests.
- Legs: lightweight hiking trousers are usually enough for mild weather, while softshell or lined walking trousers make more sense when the wind is sharp or the temperature drops.
- Rain protection for legs: I use rain trousers when the forecast includes long wet grass, boggy ground, or persistent rain that will soak through quickly.
- Socks: merino or synthetic blends work best because they dry faster and manage moisture better than cotton. One well-fitting pair is usually better than stacking on thick socks that crowd the boot.
- Hands: thin liner gloves are a smart default, and waterproof over-mitts or warmer gloves are worth carrying if the forecast is windy or wet.
- Head: a beanie for cold stops, a cap for sun or drizzle, and a buff or neck gaiter for wind make a bigger difference than people expect.
- Small comfort win: a peaked cap under a hood can keep rain off your face and help the hood sit better in gusts.
I usually pack a spare pair of socks before I pack an extra heavy top. Wet feet turn a manageable walk into a miserable one quickly, and dry socks at the end of the day are one of those quiet luxuries that make hiking feel easy again.
Once those smaller pieces are in place, the whole system becomes much more reliable, even when the forecast is indecisive.
The kit I trust on changeable UK trails
If I were packing for a typical British hill day, I would keep it brutally simple: a wicking base layer, a fleece that breathes well, a waterproof shell that fits over both, and a few small extras that protect the parts of the body that cool fastest. That setup handles most of the UK’s awkward mix of wind, damp, and sudden brightness without turning the pack into a wardrobe.
- One base layer that dries quickly and feels comfortable against the skin
- One fleece or light synthetic mid layer for warmth on the move
- One breathable waterproof shell with enough room for layering underneath
- One spare pair of socks in a dry bag
- One hat and one pair of gloves, even in shoulder season
- One extra insulated layer if the route includes long stops or exposed summits
The main lesson is that layering is not about owning more clothes; it is about choosing clothes that can be added, removed, and combined without fuss. Once that clicks, your kit starts working with the weather instead of fighting it, and the walk feels simpler from the first mile to the last.