Lighting a campfire should feel controlled, not improvised. The practical answer to how do you make a fire on a campsite is to start smaller than you think, keep the area clear, and build a structure that lets the flame breathe. In the UK, that matters even more because damp fuel, wind, and site rules can make a smoky pile of wood look “lit” long before it is actually useful.
The quickest route to a safe, useful campfire
- Start with a permitted site or a designated fire ring, not bare ground.
- Use dry tinder, pencil-thin kindling, then wrist-thick fuel wood in that order.
- Give the fire airflow; too much wood too early smothers it.
- Keep water, a shovel, and a clear escape area within reach before you light anything.
- On UK campsites, a 6-metre gap from tents, caravans, and parked cars is a sensible baseline.
- Put the fire out with water and stirring until nothing is warm.
Check the site before you strike a match
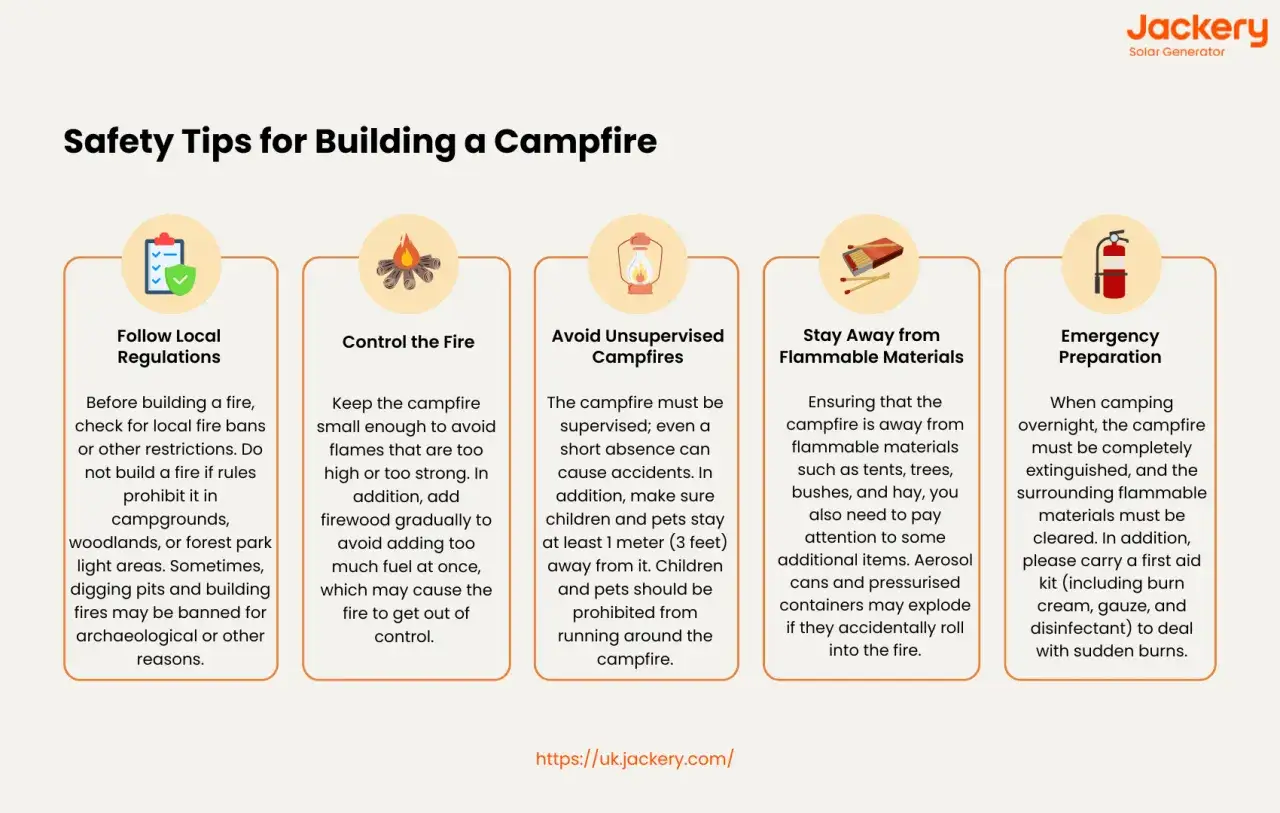
Before I think about flame, I think about permission. Many campsites in the UK allow fires only in specific rings, on certain pitches, or not at all when the weather is dry or windy. If the site does not clearly allow it, I do not improvise a campfire on grass, under trees, or next to a hedge.
Location matters just as much as permission. Keep tents, caravans, and parked cars at least 6 metres away, and make sure the fire is clear of low branches, dry grass, and anything that can catch sparks. I also keep matches, lighters, and fuel well away from children, and I never use petrol or paraffin to get a fire going. A clean, boring setup is usually the one that works.
If the wind is strong enough to push embers around, I treat that as a warning sign. A campfire can be a comfort on a family trip, but it should never become the most dangerous thing on the pitch. Once the site is right, the next question is which fire shape gives you the result you want.
Choose a fire lay that matches the job
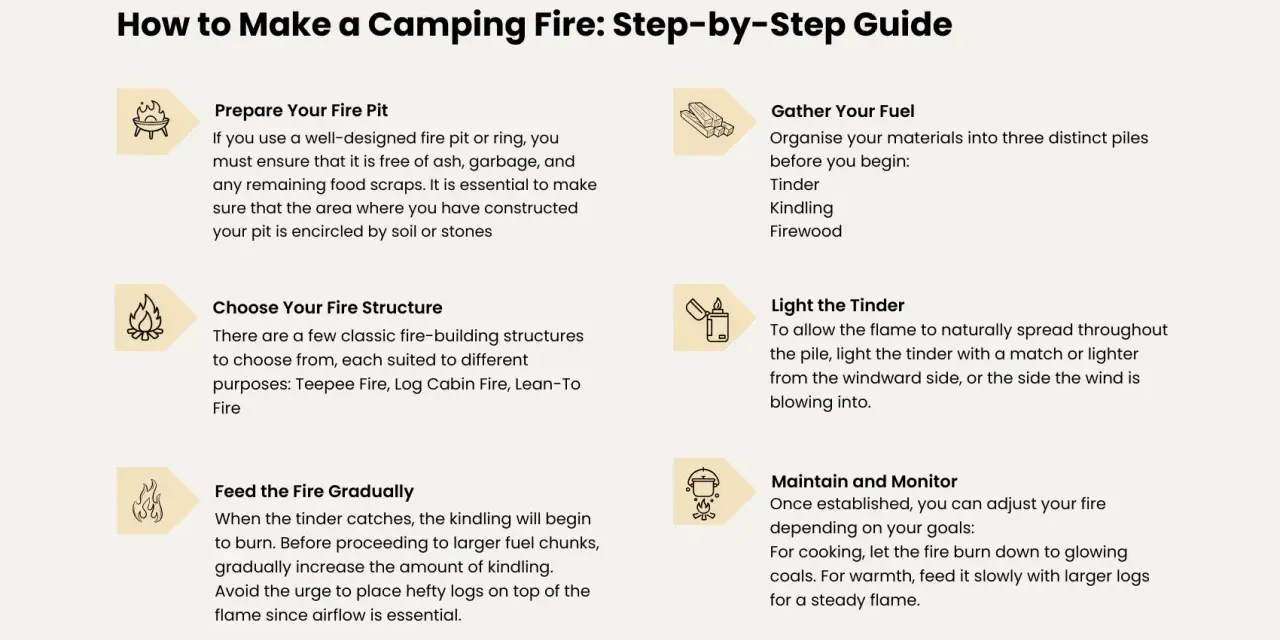
The shape of the fire changes how it burns. I do not use the same layout for a quick warmth fire, a cooking fire, and a damp evening where I need the flame to catch fast. The three layouts below cover most campsite situations.
| Fire lay | Best for | Why I use it | Trade-off |
|---|---|---|---|
| Teepee | Fast ignition and short, lively fires | Air rises through the centre, so tinder and kindling catch quickly | Burns down faster and is less stable in wind |
| Log cabin | Cooking and longer, steadier heat | It creates a better coal bed and stays organised as it burns | Takes a little longer to set up and uses more wood |
| Lean-to | Windy or damp conditions | A larger stick shelters the flame while it catches | Smaller flame and less heat than a log cabin |
For most campsite dinners, I lean toward a log cabin because I want embers, not just flames. For a quick evening fire with children nearby, a small teepee is easier to manage because it burns in a tighter, more predictable shape. The right layout saves fuel before you even light the match.
Build the fire in stages, not all at once
Good fires usually fail because people feed them too much wood too early. I build from the bottom up and keep every layer small until the layer beneath it is already burning well. That sounds slow, but it is usually faster than repeatedly relighting a smothered pile.
- Place dry tinder in the centre of the ring or fire pit.
- Add a loose layer of pencil-thin kindling around it, leaving space for air.
- Light the tinder in one or two spots and let the kindling take naturally.
- When the kindling is burning with a steady flame, add slightly thicker sticks.
- Only move to fuel wood once the fire can hold itself without constant help.
The fuel size matters. Tinder should be easy to ignite and dry enough to catch from a small flame. Kindling should be thin enough that it can burn before the heat disappears. Fuel wood should be dry, split, and about wrist thickness for a small campfire. If the wood is damp, you will get smoke first and heat second.
I also watch the sound and the smoke. A healthy fire usually sounds lively and breathes through the gaps. Thick grey smoke is a sign that the wood is too wet or the fire is starved of oxygen. In other words, the answer is rarely “more logs”; it is usually “better airflow”.
Keep the fire burning cleanly and use the heat well
Once the fire is established, maintenance becomes simpler. Add one piece of wood at a time, and leave enough space between logs for air to move. If you pile fuel on too quickly, the fire cools, smokes, and starts wasting the very wood you wanted to save.
For cooking, wait until the bright flames drop and a bed of glowing embers forms. That is the point where heat becomes more even and food is less likely to scorch on the outside while staying raw inside. It is also the point where I can cook more confidently, because the fire is doing stable work instead of roaring unpredictably.
- Add new wood only when the previous layer is established.
- Rotate pieces if one side chars before the fire spreads evenly.
- Keep damp logs out of the centre unless you want smoke and frustration.
- Move the fire ring or fire pit if sparks start drifting where they should not.
- Use a poker or stick rather than leaning over the flames with your hands.
If I want a bigger flame for warmth, I feed it gradually. If I want heat for food, I let the fire settle first. That small shift in timing makes the difference between a useful campfire and a noisy one.
Put it out until there is no heat left
A campfire is not finished when the flames disappear. It is finished when the ash is cold, the embers are dead, and nothing below the surface is still warm. I never leave a fire simply because it looks quiet from a distance.
The process is simple but it should be done properly. Stop adding fuel, pour water over the embers, stir everything with a shovel or stick, and then add more water. Keep repeating that cycle until you can hold your hand safely over the ashes without feeling heat. If you can still feel warmth, it is not out.
Do not bury embers with soil and assume the job is done. Hidden heat can stay alive longer than people expect, and it is easy to miss when the surface looks calm. A few extra minutes at the end are cheaper than a ruined pitch, a scorched ring, or a fire call nobody wanted.
When the campsite says no fire, use a better backup
Some evenings, the smartest fire tip is not to light one. If the campsite bans open flames, the wind is too strong, or the ground is too dry, I switch to a stove or a grill instead of forcing the issue. That is especially sensible on family trips, when the goal is dinner and warmth, not a lesson in managing smoke.
Whatever you use, keep it outside the tent, awning, or caravan and on a stable, non-flammable surface. Never cook inside a tent, never leave fuel-burning gear unattended, and keep any heat source away from long grass and anything that can tip it over. A compact stove is not a second-best option; in poor conditions it is the safer, cleaner choice.
I think that judgment call is part of good camping, not a compromise. The best outdoor evenings are the ones where the gear fits the conditions instead of fighting them.
The small habits that make the next campsite fire easier
I keep a simple fire kit packed separately so I am not hunting through dry bags once the sun goes down. A waterproof pouch with tinder, firelighters, matches, a lighter, and a small glove pair saves time and avoids the usual last-minute scramble.
I also prefer campsites with existing fire rings or clearly marked fire pits, because that removes guesswork and protects the ground. If I know I will want a fire, I plan around that before I leave home rather than trying to invent a safe spot on arrival. That small bit of planning usually matters more than any clever trick with sticks.
The cleanest campfires are rarely the biggest ones. They are the ones that are built slowly, kept small enough to manage, and put out completely before anyone turns in for the night.