Wet grass, drizzle, and boggy paths will quickly expose boots that were only “sort of” protected. This guide explains how to waterproof hiking boots in a way that actually works: choosing the right treatment, cleaning the boots first, applying the product properly, and keeping the protection alive on repeated walks. I’m also folding in the mistakes that usually undo the job, because that is where most people waste time and money.
The main thing is to match the treatment to the boot and keep the surface clean
- Leather, nubuck, suede, and membrane boots need different products. One treatment rarely suits every upper.
- Dirt blocks waterproofing. Clean boots first or the treatment sits on grime instead of the material.
- Apply thinly and evenly. Heavy layers do not make boots more waterproof; they usually make them less breathable.
- Drying matters as much as product choice. Keep boots away from radiators, fires, and strong direct heat.
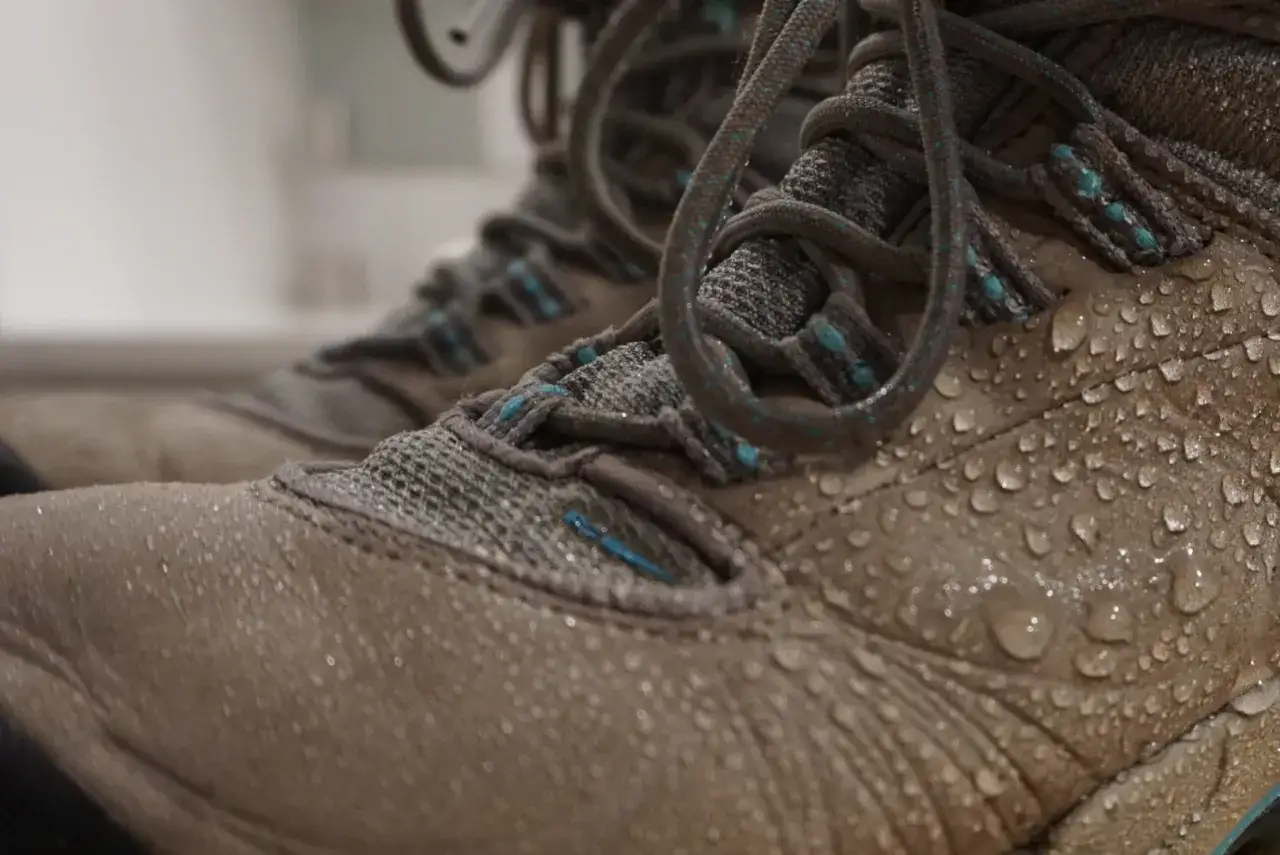
- Reproof when water stops beading. That is the clearest sign the outer layer needs attention again.
Choose the right treatment for the boot material
The first decision is not the brand on the bottle. It is the material on the boot. Full-grain leather, nubuck, suede, fabric blends, and membrane-lined boots all behave differently, so I start by matching the treatment to the upper rather than trying to force one product to do everything.
| Boot type | Best treatment | What to avoid | Typical UK cost |
|---|---|---|---|
| Full-grain leather | Leather cream or wax, if the maker allows it | Heavy soaking, harsh cleaners, direct heat | About £5-£12 |
| Nubuck or suede | Proofing spray made for textured leather | Wax that flattens the nap | About £7-£15 |
| Fabric and leather combinations | Spray-on proofer or DWR restorer | All-purpose polish and household detergents | About £7-£15 |
| Membrane boots such as GORE-TEX | Water-based restorative spray approved by the manufacturer | Waxes and greases that can hurt breathability | About £9-£18 |
The simple rule I use is this: if the boot needs breathability, do not smother it. A membrane boot is waterproof because of its construction, but the outer layer still needs to shed water cleanly so the boot does not feel heavy and clammy. That is why the outer fabric, the DWR finish, and the cleaning routine matter so much. Once you know the right treatment, the next job is preparing the boot properly so the product can bond well.
Clean the boots before you proof them
Waterproofing products work best on clean boots. Dirt, salt, trail dust, and old polish stop the treatment from reaching the material, and they can also clog the breathable layer underneath. I usually clean boots the same day I finish a muddy walk, because dried mud is much harder to remove.
- Remove the laces and, if possible, take out the insoles.
- Brush off loose dirt with a soft brush or cloth.
- Rinse the uppers with lukewarm water.
- Use a boot cleaner or a small amount of mild liquid detergent if the boots are heavily soiled.
- Work carefully around the tongue, seams, and the rand, which is the protective strip around the lower boot.
- Rinse again so no soap residue remains.
Two things are not worth doing here: machine washing and blasting the boots with heat. The first can damage glue, stitching, and leather structure. The second can dry leather out, warp materials, and shorten the life of adhesives. I prefer a natural dry-down with airflow and patience. If the boots are filthy, the right cleaning stage makes the waterproofing stage much more effective.
Apply the treatment evenly and let it cure properly
Application matters more than people expect. A good waterproofing product applied badly gives mediocre results, while a decent product applied carefully can make a noticeable difference. For most boots, I aim for a light, even coat rather than a heavy one. The surface should be covered, not dripping.
For spray treatments, hold the bottle at the recommended distance, usually around 10-15 cm, and work in an even pass over the whole upper. Focus on seams, flex points, and the toe area, because those spots take the most water. For wax or cream on full-grain leather, use a cloth or sponge and massage in a thin layer, then wipe off any excess before it builds up. Heavy wax does not make the boot stronger; it usually just clogs the surface.
One detail that matters a lot: follow the product’s drying instructions, not your impatience. Some formulas work best on dry boots, some on slightly damp leather, and some need a full overnight cure. A safe expectation is 12-24 hours, with 24 hours being the better target if the weather is cool or damp. If the product calls for heat activation, use only the method the maker recommends. Do not improvise with a radiator or a hot air gun.
If your boots have a waterproof membrane, choose a treatment that supports breathability rather than sealing the surface like a hard coating. That is the difference between a boot that keeps working on the hill and one that feels sticky from the inside after the first long climb. Once the treatment is on and dry, the next question is when to do it again.
Reproof before the boots start soaking up water
I do not wait until a boot is obviously failing. By then, the outer material has already lost a lot of its water-shedding ability. The easiest check is simple: when raindrops stop beading and start darkening the upper, the waterproofing layer needs attention again.
How often that happens depends on use. Light use may only need reproofing about once a year, while heavier use can push that to two or three times a year. In the UK, where wet paths, boggy ground, and long winter walks are common, I would expect a hard-working pair to need maintenance more often than a summer-only boot.
There is also a limit to what reproofing can fix. If water is entering through a split seam, a damaged gusset, or a torn upper, no spray or wax will solve the root problem. In that case, the right move is repair, not more product. The good news is that most failures are not true damage; they are just a tired outer finish. That is where a few avoidable mistakes can make a big difference.
Avoid the mistakes that shorten boot life
Most waterproofing failures come from a small set of errors, and they are all easy to avoid once you know them.
- Using household detergent or fabric softener. These can leave residues that hurt water repellency and breathability.
- Applying product to dirty boots. If mud and salt stay on the upper, the treatment cannot bond properly.
- Using wax on the wrong material. Wax can be fine on smooth leather, but it is usually the wrong choice for suede, nubuck, and many membrane boots.
- Drying boots on a radiator or next to a fire. Leather can stiffen and crack, and glued parts can fail sooner.
- Overapplying the product. More is not better; excess treatment can clog the surface and reduce airflow.
- Ignoring the tongue and seam lines. Those areas often let in water first because they flex and collect grime.
If you only remember one thing from this section, make it this: clean first, treat lightly, dry slowly. That sequence protects both waterproofing and comfort. From there, the last piece is building a small routine so the boots stay ready instead of becoming a weekend repair project.
Keep them ready for the next wet walk
For me, boot care works best when it is treated as maintenance rather than a rescue job. After a muddy walk, I rinse off the boots, loosen the laces, and let them dry naturally in a ventilated spot. If they are very wet inside, scrunched-up paper can help draw moisture out, but I change it regularly so it does not become damp itself.
Storage matters too. Keep boots out of direct sun, away from boilers and radiators, and somewhere they can fully dry between outings. If you hike often, especially through autumn and winter, it is worth keeping a small kit ready: a soft brush, a boot cleaner, and the correct proofing product for the boot material. In the UK, that usually costs less than replacing a pair prematurely, and it keeps the boots performing the way they should.
The most useful habit is also the simplest one: once water stops beading, clean the boots and renew the treatment before the next trip. Do that consistently, and your hiking boots will stay drier, breathe better, and last noticeably longer on the kind of wet ground that makes British walking memorable.