Setting up a tent is one of those camping jobs that looks easy until the ground slopes away, the wind picks up, and the poles seem to have their own opinion. This guide breaks down how to set up a tent on a real campsite: choosing the right spot, building the frame, anchoring it properly, and avoiding the mistakes that waste time on arrival. I’m keeping it practical for family trips, car camping, and the mixed weather you get on British campsites.
The quickest route to a stable pitch is to choose the right ground, build the frame carefully, and secure the tent before you move inside.
- Site first, fabric second. Flat, well-drained ground matters more than speed.
- Different tent styles need different setups. Dome, tunnel, pop-up, and air tents behave differently under tension.
- Do not rush the pegs. Good anchoring is what keeps the pitch steady in wind and rain.
- Ventilation matters. A tent that cannot breathe will collect condensation fast.
- Pack-down is part of setup. A dry, clean tent is much easier to pitch next time.
Check the ground and the weather before you unpack anything
I always spend a minute looking at the pitch before opening the bag. A surface can look flat and still hide roots, shallow dips, or a gentle slope that becomes annoying once you try to sleep on it. On a UK campsite, I want dry, level, durable ground, a bit of shelter from the prevailing wind, and enough space for guy lines without blocking paths or neighbouring pitches.
The style of tent changes the amount of forgiveness you get during setup, so it helps to know what you are working with before you start.
| Tent style | What changes during setup | Best use case |
|---|---|---|
| Dome | Usually self-supporting once the poles cross, so it is more forgiving on uneven ground. | General family camping and short breaks. |
| Tunnel | Needs careful alignment and strong pegging because the shape depends on tension. | Larger living space and longer stays. |
| Pop-up | Fastest to raise, but less adjustable if the ground is awkward or the wind is fresh. | Short stays and light summer camping. |
| Air tent | Uses inflation order rather than pole threading, so even tension matters more than speed. | Family trips where convenience matters. |
The rule stays the same no matter the style: stable ground first, frame second, tension last. Once you know the shelter you are dealing with, the actual pitch becomes much less improvised.
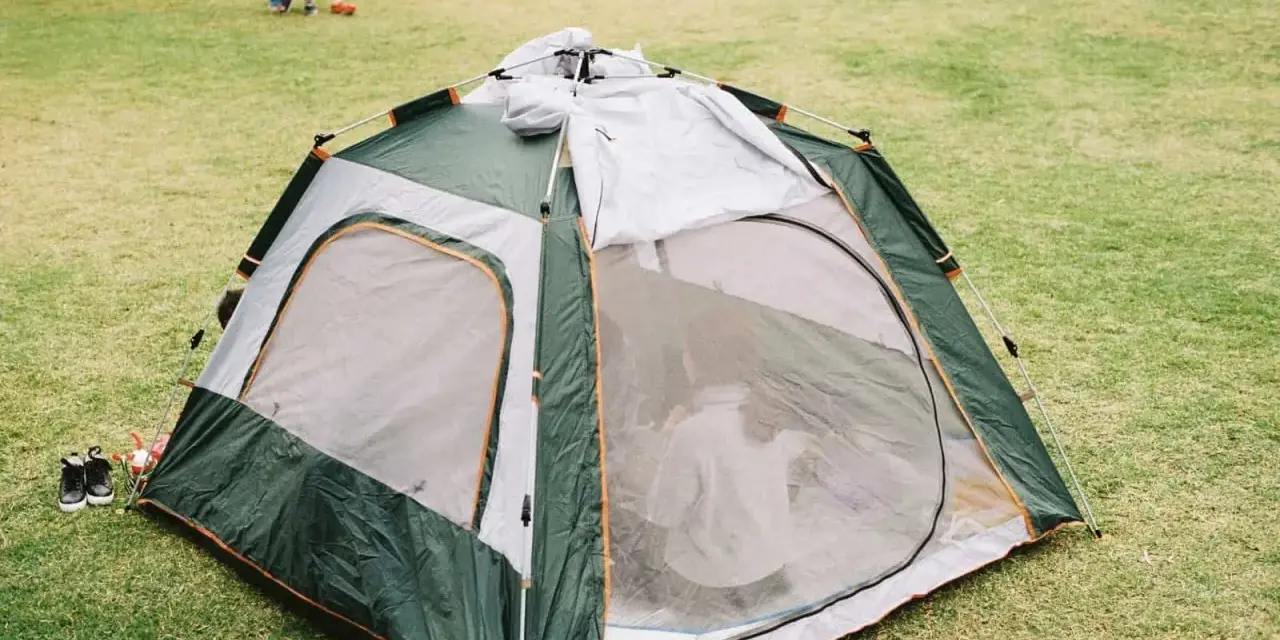
Lay out the frame before you chase the flysheet
When I start the build, I spread out the tent body or footprint first and line up the door exactly where I want it. That sounds basic, but a small misalignment at the start turns into awkward tension later. If the tent has separate inner and outer layers, I keep the fabric flat and untwisted before I touch the poles.
- Clear away stones, twigs, and anything sharp that could damage the floor.
- Lay the tent body in position and point the door towards the view, the path, or the windbreak you want.
- Join the poles carefully and check that every section is seated properly.
- Thread poles through sleeves or clip them on, depending on the design.
- Peg two opposite corners lightly so the tent cannot slide around.
- Raise the main structure slowly and make sure the poles are not forced.
- Attach the flysheet and align it so the doors and vents sit where they should.
- Tension the fabric gradually rather than pulling one side too hard too soon.
If you are using an air tent, the sequence is similar even though the hardware changes: secure the corners, inflate evenly, then let the fabric settle before tightening anything. Rushing the frame usually creates more trouble than it saves, and the next step is where that restraint pays off.
Anchor it for British weather, not just calm weather
Wind is what turns an easy pitch into a frustrating one. I peg the corners first, then add the guy lines, and I do not over-tighten them. A tent should look clean and firm, not stretched like it is trying too hard. If the site is exposed, I orient the strongest side of the tent into the wind and keep the lower, narrower end facing the gusts.
The peg you use matters more than most beginners expect.
| Ground | Better peg choice | Why it helps |
|---|---|---|
| Soft grass | Y or V pegs | More surface area gives better grip. |
| Hard-packed soil | Slim steel pegs | They go in cleanly without bending as easily. |
| Sand or loose soil | Wide sand pegs or buried anchors | They resist pull-out when the wind lifts the fabric. |
I also keep an eye on the flysheet and the inner tent. They should not touch if I can help it, because contact points are where condensation becomes drips. That small gap is one of the quiet advantages of a well-pitched tent, and it leads directly into making the inside liveable.
Make the inside usable before darkness falls
Once the shell is standing, I treat the tent like a small room rather than a sack of fabric. Sleeping mats go flat, bags stay out of the doorway, and wet boots move into the porch or vestibule instead of into the sleeping area. The goal is not just comfort; it is to make the space safer and easier to use when you need a torch at night.
- Keep the groundsheet slightly inside the tent perimeter so rainwater does not collect under the edges.
- Leave roof vents open unless weather is genuinely blowing rain into them; airflow reduces condensation.
- Store keys, a torch, and water where you can reach them without climbing over other people.
- Give children a clear corner for clothes or toys so the floor does not become cluttered immediately.
If you are camping as a family, a neat layout matters more than people think. The calmer the inside feels, the less time you spend searching for socks, tripping over guy lines, or dragging damp gear across the sleeping area. That kind of organisation also makes the common mistakes easier to spot, which is what I look at next.
The mistakes I see most often when people pitch a tent
Most tent problems start as setup problems. A lot of leaks, flapping fabric, and bent poles are blamed on the rain or the tent itself, when the real issue was the pitch. The good news is that the same few mistakes cause most of the trouble, and they are all avoidable.
- Choosing the lowest-looking spot. Water always finds the dip, even if the ground seems level at first glance.
- Leaving pegs until the end. Tents settle under tension, so the shape changes once the frame is loaded.
- Pulling guy lines too tight. Over-tension distorts the fabric and can stress poles and seams.
- Ignoring the manufacturer’s order. Pole sleeves, clips, and air beams do not all want the same sequence.
- Letting the flysheet touch the inner tent. That creates damp contact points and makes condensation worse.
- Packing away a damp tent and hoping for the best. Mildew moves faster than your next trip.
When I slow people down on just two points, it is usually site choice and pegging. Those two decisions do more to improve a pitch than any expensive accessory, and they also make takedown much less annoying.
Pack it away cleanly so the next pitch is easier
I reverse the process slowly: loosen the guy lines, remove the pegs in a sensible order, shake off debris, and fold or stuff the fabric without grinding dirt deeper into the weave. If the tent is dry, great. If it is damp, I air it at home as soon as possible instead of leaving it compressed in a bag for days.
- Wipe pegs clean before they go back into the peg bag.
- Check pole ferrules, elastic cord, and zips for wear while everything is still in your hands.
- Roll the footprint or groundsheet separately if it is muddy.
- Store the tent loosely rather than cramming it into a damp garage shelf.
A few minutes of care at the end of a trip saves a lot of frustration the next time you arrive on site. It also extends the life of the fabric, which matters if you camp more than once or twice a season. From there, the final gains are usually about habit rather than hardware.
The small habits that make campsite mornings easier
The best tent setups are usually the ones that feel boring by day two. I keep the peg bag, mallet, and spare guy line in the same pocket every time, and I mark poles if the tent has similar-length sections. That saves more time than any flashy accessory, especially when you are pitching in fading light.
For family camping, I also place the door away from the main footpath and leave a little porch space for wet shoes, jackets, and a folding crate of food. It keeps the sleeping area calmer, and it gives children a clear place to dump their kit without collapsing the whole layout. If I know the pitch will be windy, I practise at home once before the trip; fifteen minutes in the garden can save half an hour of confusion on arrival.
When I think about setting up a tent well, I do not think about speed first. I think about sequence: site, frame, pegs, tension, then interior. Get those five things right and even a simple shelter feels steadier, drier, and easier to live in.