Understanding the parts of a kayak matters because each component changes how the boat feels, turns and carries gear. I’m breaking down the main components, the differences between sit-in and sit-on-top designs, and the features that make a real difference on British water. By the end, you should be able to read a kayak quickly and judge whether it suits relaxed lake paddling, coastal days or a family trip from camp.
The quickest way to read a kayak at a glance
- Every kayak starts with the same basics: bow, stern, deck, hull and a place to sit.
- Fit matters as much as shape, because the cockpit, seat and foot braces control comfort and power.
- Sit-in and sit-on-top boats use different layouts, so the useful features are not always the same.
- The hull and keel line have the biggest influence on speed, tracking and turning.
- On UK paddles, storage, drainage and wind handling often matter more than flashy extras.
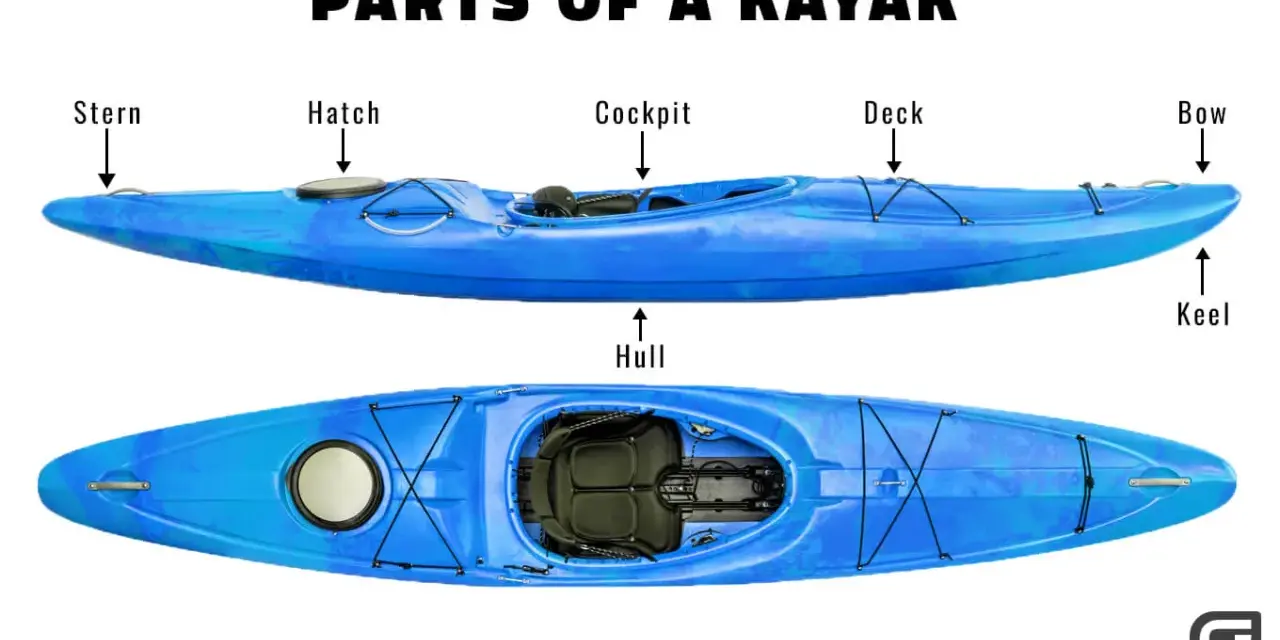
The main parts of a kayak and how they work together
When I look at a kayak, I start with the shape that sits in the water, then I work outward to the fittings. That order tells you more than any sales label. The hull decides how the boat behaves, the deck carries the fittings, and the cockpit area decides how much control you actually have once you sit in it.
| Component | What it does | Why it matters |
|---|---|---|
| Bow | The front of the kayak | Helps the boat meet waves and slice forward cleanly |
| Stern | The rear of the kayak | Affects how the boat carries speed and tracks behind you |
| Deck | The top surface | Holds fittings, handles and deck storage |
| Hull | The underside | Controls stability, speed and turning behaviour |
| Keel line | The centreline running bow to stern | Often improves straight-line tracking |
| Seat | Where you sit and support your posture | Bad seating quickly becomes fatigue, even on a short outing |
| Foot braces | Adjustable rests for your feet | Let you brace properly and transfer power into the stroke |
| Hatches and bulkheads | Storage access and internal watertight divisions | Useful for dry kit, buoyancy and rescue safety |
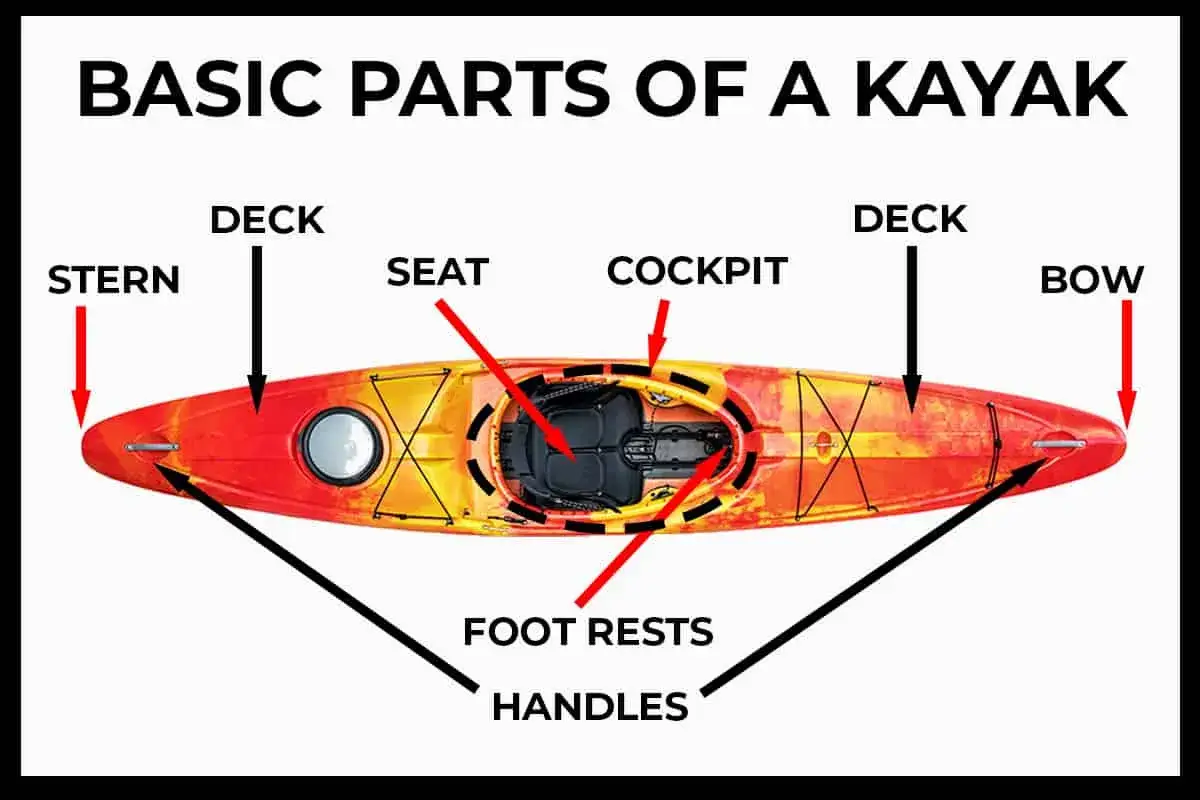
For orientation, the bow is the front and the stern is the back; port means left and starboard means right. Those terms sound technical until you need them in wind or on a shore landing, and then they become very useful very quickly. Once that layout is clear, the next question is whether the boat is built as a sit-in or a sit-on-top.
How sit-in and sit-on-top designs change the layout
The same kayak anatomy can feel quite different depending on whether you sit inside the boat or on top of it. I usually treat this as the first real fork in the road, because it changes comfort, security, storage and how the boat handles splashes or cooler conditions.
| Feature | Sit-in kayak | Sit-on-top kayak |
|---|---|---|
| Cockpit | Enclosed opening with a rim | No enclosed cockpit; you sit on the deck |
| Water control | Can use a spray skirt to keep water out | Open layout sheds water more freely |
| Storage | Usually better sealed storage with hatches and bulkheads | Often has simpler deck storage and less internal space |
| Fit and control | More connected feel, especially with braces and thigh contact | More open and forgiving, but less enclosed |
| Best use | Touring, colder conditions and longer paddles | Relaxed sessions, warmer days and easy family use |
A sit-in boat usually gives me more control around the torso and legs, which is why it feels more precise when the water turns messy or the wind picks up. A sit-on-top is simpler to use and easier for casual launching, which is one reason it works well for family trips or short, warm-weather paddles. The right choice is not about status; it is about what you want the boat to do when you are actually on the water.
What the hull and keel tell you on the water
If I had to pick one area to study closely, it would be the hull. The hull shape does most of the work, and it quietly decides whether a kayak feels settled, fast, twitchy or easy to turn. The keel line and rocker matter too, because they change how the boat follows a course and how much effort you spend correcting it.
- Flat hulls feel reassuring at first and are easy to turn, but they can wander more in a breeze.
- Rounded or soft-chined hulls give a smoother, more forgiving feel, especially for relaxed paddling.
- Hard chines create a sharper edge between side and bottom, which can help with edging and turning response.
- More rocker means the bow and stern lift more toward the ends, which makes the kayak turn more easily.
- Less rocker helps the boat track straighter and usually suits longer, calmer crossings.
In practical terms, a kayak that tracks well saves energy on exposed water, while a more rocker-heavy hull feels livelier in tight spaces or on moving water. That trade-off is exactly why two boats with similar lengths can feel completely different. Once you understand hull behaviour, the cockpit becomes the next place where comfort and control either come together or fall apart.
Why the cockpit fit matters more than most beginners expect
A kayak can look perfect on paper and still feel wrong the moment you sit down. The cockpit is where your body meets the boat, so small differences in seat height, brace position and thigh contact make a bigger difference than most newcomers expect. I would always choose a well-fitting cockpit over a boat loaded with features I never use.
- Seat should support you without forcing you to slump or over-arch your back.
- Foot braces should let you keep a slight bend in the knees and push without stretching too far.
- Thigh braces should give a light, secure hold so you can edge and brace without pinching.
- Cockpit coaming should be tidy and strong enough to hold a spray skirt if the design uses one.
- Backband or backrest should support posture without blocking torso rotation.
The simple test I trust is this: if I can sit upright, brace my feet comfortably and move my knees without fighting the boat, the fit is probably right. If I have to shuffle every few minutes, the seat or cockpit layout is asking for trouble. From there, the next practical question is how the boat handles storage, drainage and rescue-related fittings.
Deck fittings and storage that earn their keep
This is the section that many buyers skim, and it is usually the section they end up caring about later. Deck fittings look like small details, but they are the pieces that make a kayak easier to carry, easier to rescue and easier to load for a day out. On a longer British paddle, I want these details to be practical, simple and dependable.
- Hatches give access to dry storage, but only if the lids seal properly.
- Bulkheads divide the inside of the kayak and add buoyancy, which matters if water gets into one end of the boat.
- Deck lines give you something to grab in a rescue or while handling the kayak from the shore.
- Carry handles or toggles make launch and landing less awkward, especially on shingle, slipways or campsite banks.
- Bungees are useful for light kit, but they are not a substitute for a proper dry bag or sealed hatch.
- Skeg controls or rudder pedals help with tracking, especially when wind starts pushing the stern around.
- Scupper holes on sit-on-tops let water drain off the deck instead of pooling under you.
The useful rule here is simple: if a fitting helps you carry, store, drain or recover the boat, it earns space. If it is only there to look technical, I am much less interested. That is especially true once you start paddling in the conditions common across the UK, where the weather rarely stays as calm as it looked in the car park.
What I would choose for British paddling conditions
For calm lakes and sheltered rivers, I value a stable hull, an easy-to-fit seat and enough storage for a layer, water and a snack. For coastal paddling, I pay much more attention to tracking, hatch security, deck lines and whether the kayak handles wind without constant correction. A windy afternoon on an estuary can expose weaknesses very quickly, and a boat that felt fine on land may suddenly feel busy in the water.
For family and camping use, I usually lean towards the simplest design that still gives a comfortable fit. That might mean an open sit-on-top for easy access and relaxed days, or a sit-in kayak if the trip involves colder water, longer distances or more gear. I do not chase the most aggressive hull unless the paddling itself demands it, because comfort and confidence matter more on real trips than theoretical speed.
- Choose a more stable kayak if the plan is relaxed day paddling or family use.
- Choose better tracking if you expect wind, crossings or longer open-water stretches.
- Choose sealed storage if you are carrying layers, lunch or camping kit.
- Choose easier access if the boat will be shared between different paddlers.
- Choose a secure cockpit fit if you want better control in rougher water.
That balance is usually what turns a kayak from a nice-looking purchase into a genuinely useful boat. Once you know the conditions you want to paddle in, the final step is making a habit of checking the boat properly before it leaves the shore.
The checks I make before every launch
I keep my pre-launch check short, because the goal is to catch obvious problems before they become annoying or unsafe. A minute on shore is far cheaper than fixing a loose fitting, a jammed skeg or an uncomfortable seat half a mile from the car park.
- Seat positioned and comfortable.
- Foot braces set so the knees stay slightly bent.
- Hatches shut and seals sitting flat.
- Deck lines clear and not tangled with loose kit.
- Skeg or rudder moving freely, then fully raised for launch if needed.
- Scupper areas clear on a sit-on-top.
- Load balanced so the kayak sits level.
- Buoyancy aid on before the boat leaves the shore.
When you understand what each component does, you stop seeing a kayak as one object and start seeing how the whole system works together. That makes buying, fitting and paddling much easier, whether the day ends with a quiet lake circuit or a longer outing from a campsite on the British coast.