The right bike camping gear turns a ride into a trip you can actually enjoy: the bike stays stable, the sleep setup works when the weather turns damp, and you still have the tools to fix small problems before they become a long walk. In this guide I cover what to pack first, how to choose shelter and sleep kit for British conditions, how to carry everything without upsetting the handling, and which extras are worth the weight. I’m also including the trade-offs that matter on real routes, because the lightest kit is not always the smartest kit.
The essentials that matter most on the bike and at camp
- Start with the route: an overnight campsite loop needs less than a remote mixed-surface route.
- Keep the sleep system simple: a compact shelter, a warm-enough bag or quilt, and an insulated pad do most of the work.
- Balance the load: central weight is easier to ride than overloaded panniers or a sagging seat pack.
- Carry repair basics: tube or tubeless plugs, pump, multi-tool, quick link, tyre levers, and a spare hanger if your bike uses one.
- Plan for rain: a waterproof shell, dry layers, and sealed storage are more important in the UK than novelty extras.
What to pack first for a cycling camp
I start with the trip itself, because route length and terrain decide the load more than brand names do. A one-night loop on lanes and hardpack can stay minimal; a four-day route with long gaps between shops needs more food, water, and repair margin. My rule is simple: pack the things that keep the trip functional first, then add comfort only if the weight still feels justified.
| Trip type | What matters most | What can stay lighter |
|---|---|---|
| One-night campsite loop | Shelter, sleep insulation, rain protection, basic tools | Stove size, spare clothing, luxury camp items |
| Multi-day route with regular shops | Repair kit, food storage, charging, weatherproof layers | Large food reserves, oversized cook kit, heavy containers |
| Remote gravel or moorland ride | Extra water capacity, warmer sleep system, stronger lights | Anything that only saves a few grams but reduces reliability |
| Family or relaxed adventure | Easy camp setup, simple cooking, comfort in bad weather | Strict ultralight choices that make camp harder to enjoy |
The easiest mistake is packing for the imagined trip instead of the actual one. I would rather leave out the stove on a short ride than discover at dusk that the pump, light, or dry layer never made it into the bag. Once that base is sorted, the sleep system becomes the next big decision.
Choose a sleep and shelter system that fits British weather
For the UK, I bias toward a tent more often than a tarp-only setup, mainly because wind, damp ground, and insects can turn a minimalist night into a miserable one very quickly. If you already know how to pitch a tarp well, it can work beautifully, but it rewards experience and a forgiving forecast. A bivy is compact and useful in emergencies, yet it is a compromise if you expect steady rain or want a dry place to change.
| Option | Best for | Main advantage | Main drawback |
|---|---|---|---|
| Tent | Most UK trips, first overnighters, mixed weather | Best all-round protection, privacy, and bug control | Heavier and bulkier than the bare-minimum options |
| Tarp plus inner | Experienced riders, fair weather, careful packing | Light, flexible, and very compact | Less forgiving in wind and heavy rain |
| Bivy bag | Minimalist trips, backup shelter, emergency use | Tiny pack size and very fast setup | Condensation, less comfort, and limited headroom |
Sleep insulation matters more than many riders expect. I prefer a sleeping bag or quilt that is genuinely comfortable for the coldest likely night, not merely survivable, because fatigue from a poor night changes the whole next day. For shoulder-season riding, a comfort rating around 0-5°C gives more freedom; for summer-only trips, a lighter bag can make sense, but only if you are honest about where you’re riding and how cold you sleep.
Do not treat the sleeping pad as an afterthought. It is not only about comfort; it is also your main insulation from wet ground and cold air under you. A pad with decent insulation and a shape you can actually sleep on is worth more than a flashy cook pot. With sleep handled, the next job is getting the load onto the bike without making it feel nervous.
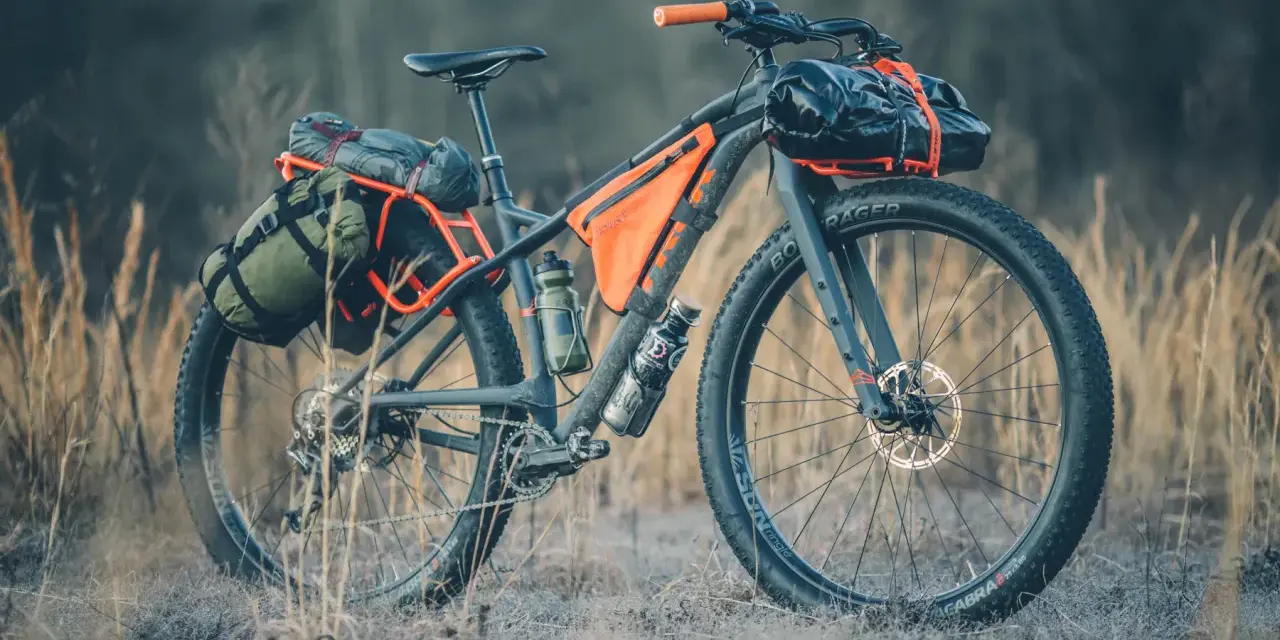
Carry the load without ruining the ride
The rule I follow is simple: the heavier and denser the item, the more central and lower it should sit. The bottom bracket area, meaning the crank zone, is the most stable part of the bike, so that is where I want tools, food, battery packs, and other dense items if the frame allows it. Light, bulky kit belongs elsewhere.
| Storage type | Works well for | Where it struggles |
|---|---|---|
| Frame bag | Tools, food, battery bank, denser items, water on compatible frames | Limited space on small frames and awkward bottle access |
| Handlebar roll | Sleeping bag, mat, spare clothing, other compressible items | Can affect steering if overloaded or packed unevenly |
| Seat pack | Clothing, soft camp gear, lighter items | Can sway on rough trails if stuffed too high or too full |
| Top tube bag | Snacks, phone, lip balm, sunscreen, small camera | Only useful for compact, frequent-access items |
| Panniers | Road-heavy touring, bulky loads, easy access at camp | More wind drag and more movement on rough bikepacking routes |
I like to think in zones. Dense and heavy things go low and central; soft and bulky items go in the less critical spaces; frequent-use items stay within reach. If the steering feels vague, I move weight away from the front. If the back of the bike starts to wag, I reduce seat-pack volume before I do anything else. Panniers are not wrong, but on rougher routes they are usually a touring solution rather than a bikepacking one.
The practical test is simple: the bike should still feel like a bike. If it starts feeling like a shopping trolley, the load is too high, too far back, or too loosely packed. Once the bike handles cleanly, the kit still has to solve the problems that happen mid-ride.
Carry the repair and safety kit that saves rides
When people underpack, it is usually not the tent that causes the problem. It is the one missing tool, the dead light, or the puncture repair kit that was left at home because it felt boring. I treat the repair and safety kit as ride insurance, not optional extras.
- Flat repair: pump, 1-2 spare tubes, tyre levers, patches, tubeless plugs if relevant, and a valve tool if your setup needs one.
- Drivetrain fixes: multitool with chain breaker, quick link, and a spare derailleur hanger if your frame uses one and the route is remote.
- Navigation and power: phone with offline maps, a paper backup for longer trips, front and rear lights, and a power bank.
- Personal safety: small first-aid kit, plasters, sterile wipes, blister care, ID, cash, sunscreen, insect repellent, and any medication you use regularly.
For power, I find 10,000 mAh enough for a simple overnight if I am careful, while 20,000 mAh gives more breathing room for a longer weekend or colder conditions where batteries drain faster. If you are using phone navigation all day and running lights after dark, that extra capacity stops the trip from becoming a battery-management exercise. I also like to keep one small dry bag or pouch dedicated to tools so I can reach them without emptying camp onto the ground.
Those items are not glamorous, but they are the reason small issues stay small. The exact contents shift once you factor in British weather and camping rules.
Adjust the kit for UK weather, campsites, and access rules
Cycling UK’s packing advice starts with the basics, and that is the right instinct here: shelter, sleep insulation, rain gear, food, water, and a puncture kit before anything decorative. British conditions reward that discipline. A dry bag matters, but a dry body and a warm sleep system matter more.
GOV.UK’s access guidance is also worth keeping in mind before any overnight in England and Wales, because camping is not usually allowed on access land without permission. Scotland is the more permissive exception, but even there the expectation is a small, temporary, low-impact camp. My practical rule is straightforward: if the route crosses into different parts of the UK, I plan around the strictest overnight rule I might encounter rather than assuming one model fits everywhere.
| Condition | Practical adjustment | Why it helps |
|---|---|---|
| Persistent rain | Waterproof shell, pack liner, dry socks, good tent ventilation | Prevents wet layers and damp sleeping kit from ruining the trip |
| Cold spring or autumn nights | Warmer bag or quilt, insulated pad, dry base layer for sleeping | Stops the night from becoming a recovery problem the next day |
| Short daylight | Reliable front and rear lights, reflective details, earlier camp setup | Reduces stress when progress is slower than planned |
| Midge season or still evenings | Repellent, head net if needed, enclosed shelter, covered campsite choice | Makes camp far more bearable in certain regions and months |
| Dry or remote stretches | Carry 2-3 litres of capacity and consider a filter only if water is uncertain | Gives you a buffer without loading unnecessary weight everywhere |
For family trips or less experienced riders, I would lean toward a campsite-first plan because water, toilets, and a known pitch remove a lot of friction. That is not less adventurous; it just frees the ride to be about the route instead of about improvising every evening. Once the environment is accounted for, the final decision is how to build the kit without buying things twice.
A lean packing system that gets better with each trip
When I help someone build a setup from scratch, I think in rough budget bands rather than perfect shopping lists, because prices move and people already own some useful pieces. As a planning guide, a repurposed starter setup can be assembled for about £150-£300 if you already have some camping kit, a solid first full setup often lands around £300-£800, and lighter or more durable premium builds can go well beyond that. Those ranges are not fixed rules; they are a realistic way to keep spending tied to the trip you actually want to take.
| Spend first on | Why it comes first |
|---|---|
| Shelter | It protects the entire trip if the weather turns |
| Sleep system | It determines whether you recover overnight |
| Repair kit and lights | They prevent a small problem from ending the ride |
| Bags and storage | They improve stability and make the load easier to live with |
If I were starting from zero, I would spend on shelter, sleep, and tyres before chasing ultralight bags or a fancy stove. Those three things decide whether the trip feels calm or compromised. The useful test is still hands-on: pack everything, ride for 20 to 30 minutes on rougher roads, then check what rubs, what bounces, and what you could not reach quickly enough. If the setup passes that test, it is ready for a night out rather than just a shopping list.